Replacing Outdoor Pot Lights
Outdoor pot lights, often called well lights, are a popular choice for illuminating gardens, patios, and other outdoor spaces. They provide a subtle and even lighting that enhances the beauty of landscaping and architectural features. Over time, however, these lights may need to be replaced due to age, damage, or a desire for an updated look. Replacing outdoor pot lights is a straightforward process that can be accomplished with basic DIY skills and appropriate tools. This article outlines the steps involved in replacing outdoor pot lights, providing insights into the necessary materials, safety precautions, and troubleshooting tips.
Understanding Outdoor Pot Lights
Outdoor pot lights are typically constructed from durable materials like aluminum or stainless steel, with either a recessed or surface-mounted design. They offer a range of lighting options, including incandescent, halogen, LED, and solar-powered bulbs. The type of light source chosen will influence the wattage, color temperature, and energy efficiency of the fixture. LED bulbs are an increasingly popular choice for outdoor pot lights due to their long lifespan, energy savings, and durability. Regardless of the type, the fixture must be rated for outdoor use and meet local electrical codes.
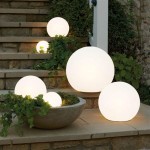
Outdoor pot lights are often installed in discreet locations to avoid obstructing views while providing targeted illumination. Typical placement includes near walkways, steps, and garden features. The installation process involves mounting the fixture to a wall, deck, or ground surface and connecting it to a power source. The wiring and installation should be performed by a qualified electrician to ensure proper connections and safety compliance.
Choosing Replacement Pot Lights
Replacing outdoor pot lights requires careful consideration of several factors, including the existing fixture's size, style, and light source. The first step is to measure the existing pot light's dimensions to ensure the replacement fits seamlessly. The new fixture should also match the existing style, whether it is a sleek modern design or a traditional aesthetic. If the existing fixture is incandescent or halogen, consider upgrading to LED bulbs for increased energy efficiency and longevity.
Another important consideration is the light output, measured in lumens. Higher lumen output provides brighter illumination. Choosing a replacement with a similar lumen output to the original will ensure consistent brightness. Additionally, consider the color temperature of the light, measured in Kelvin (K). Warm white (2700-3000K) provides a cozy and inviting atmosphere, while cool white (4000-4500K) offers a brighter and more contemporary look. Finally, ensure that the replacement pot light is rated for outdoor use and weatherproof, to withstand the elements and ensure longevity.
Replacing the Pot Light
Once you've chosen the replacement pot light, you can begin the replacement process. This step-by-step guide outlines the process, emphasizing safety precautions and practical tips:
Step 1: Disconnect Power
Before starting any work, disconnect the power to the circuit powering the outdoor pot light. This is crucial for safety and prevents electric shocks. Locate the circuit breaker in the electrical panel that controls the light and switch it to the "OFF" position.
Step 2: Remove Existing Pot Light
Carefully detach the existing pot light from its mounting location. If it is a recessed fixture, remove the trim ring and any screws securing the fixture to the wall or deck. For surface-mounted fixtures, detach the screws or clips holding the fixture in place. Be sure to note how the fixture is wired, as this will be helpful when installing the new one.
Step 3: Install New Pot Light
Mount the new pot light in the same location as the old one. Align the mounting holes and secure the fixture using the included hardware. If the new fixture is a recessed type, ensure it is flush with the wall or deck surface. For surface-mounted fixtures, attach the fixture to the mounting surface using the provided screws or clips.
Step 4: Connect Wiring
Connect the wiring of the new pot light to the existing wiring. Ensure the wires are properly matched, with black to black, white to white, and ground to ground. Secure the wire connections using wire nuts. If the new fixture has a ground wire, ensure it is properly grounded. You may need to use a wire stripper to expose the wire ends for proper connections.
Step 5: Test the New Pot Light
Once the wiring is complete, restore power to the circuit. Turn the circuit breaker back to the "ON" position and test the new pot light. Ensure it lights properly and that all connections are secure. If the light doesn't turn on or if there are loose connections, consult the manufacturer's instructions or contact a qualified electrician for assistance.
Troubleshooting Tips
While replacing outdoor pot lights is generally a straightforward process, there are some common problems that can arise. If the light doesn't turn on after installation, check the following:
- Check the circuit breaker: Ensure the circuit breaker is switched to the "ON" position. If the breaker has tripped, reset it by switching it to the "OFF" position and then back to the "ON" position.
- Inspect the wiring connections: Ensure all wire connections are secure and properly matched. Use a screwdriver or pliers to tighten any loose connections.
- Test the bulb: If the fixture has a removable bulb, test it in a working outlet to verify it is functional. Replace the bulb if necessary.
- Check for a blown fuse: If the fixture has a replaceable fuse, check it and replace it if necessary.
If the pot light still doesn't work, it's best to consult a qualified electrician to diagnose and troubleshoot the issue. They have the expertise and tools to safely identify and address any electrical problems.

Soffit Lighting Installing Outdoor Recessed Lights

How To Replace Exterior Recessed Light Fixture

Exterior Recessed Soffit Lighting Aspectled

Outdoor Recessed Lighting Guide Tutor

8 Soffit Lighting Ideas For Exterior Perfection Dekor

6 Ways Exterior Pot Lights Will Enhance Your Home Quinju Com

8 Soffit Lighting Ideas For Exterior Perfection Dekor

Why Up Lighting Is A Better Alternative To Recessed Soffit

How To Install An Ultra Thin Led Downlight Outdoors 1000bulbs

Soffit Lighting Installing Outdoor Recessed Lights
Related Posts