Outdoor Lights: Low Voltage Deck Post Installation
Outdoor lighting is essential for enhancing the ambiance and safety of a deck. Low-voltage deck post lights are a popular choice due to their ease of installation, energy efficiency, and aesthetic appeal. This article provides a step-by-step guide on how to install low-voltage deck post lights, ensuring a seamless and efficient process.
1. Planning and Preparation
Before commencing the installation, careful planning is crucial. This includes determining the desired lighting layout, selecting the appropriate fixtures and materials, and ensuring safety precautions are in place.
A thorough understanding of the existing electrical system is essential. Check the breaker box to identify the circuit dedicated to the deck area. Ensure the circuit has adequate capacity to handle the additional load of the lights. If necessary, consult a qualified electrician to ensure proper wiring and safety measures.
Next, decide on the desired lighting layout. Consider the size of the deck, the placement of furniture, and the desired ambiance. Mark the locations for the post lights using stakes or spray paint. Choose fixtures that complement the deck's design and materials. Explore various styles, finishes, and light output options to achieve the desired effect.
2. Installing the Deck Post Lights
Once the planning is complete, proceed with the installation of the deck post lights. This involves attaching the fixtures to the posts and connecting them to the electrical system.
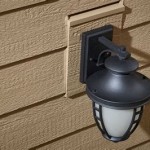
Start by mounting the light fixtures to the deck posts. Use appropriate mounting hardware, such as screws, bolts, or brackets, depending on the fixture type. Ensure the fixtures are securely fastened and level. If installing multiple lights, maintain a consistent spacing for an aesthetically pleasing arrangement.
Next, run the low-voltage wiring from the transformer to each light fixture. Use weather-resistant cable and appropriate connectors for a secure electrical connection. Route the wiring discreetly along the underside of the deck or through existing conduit. Avoid running wiring over high-traffic areas or sharp edges.
3. Connecting to the Electrical System
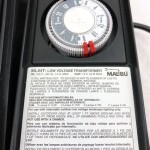
The final step involves connecting the low-voltage wiring to the transformer and ensuring proper grounding. This crucial step ensures the safe operation of the lights.
Locate a suitable location for the transformer, typically near the existing electrical panel or a nearby exterior outlet. Connect the transformer to the dedicated electrical circuit using weatherproof connectors. Ensure the transformer is properly grounded to prevent electrical shock.
Connect the low-voltage wiring from the transformer to each light fixture. Use weatherproof connectors to ensure a secure and watertight connection. Follow the manufacturer's instructions for specific wiring configurations. Finally, test the lights to confirm proper operation and ensure all connections are secure.

How To Install Low Voltage Landscape Lighting Deck Lights

Post Cap Lighting Low Voltage Decksdirect

Hampton Bay Low Voltage 50 Lumens Black Outdoor Integrated Led 4x4 And 6x6 Deck Post Light Weather Water Rust Resistant 62944 The Home Depot

How To Install Low Voltage Deck Lights

How To Install And Maintain Fence Deck Post Caps

How To Install Low Voltage Landscape Lighting Deck Lights

Led Deck Rail Lighting Decksdirect

How To Install Deck Lighting Using Low Voltage Lighted Post Caps Traditional Kansas City By Moonlight Decks Llc Houzz

How To Install Low Voltage Lighted Post Caps Deck Lighting Moonlight Decks

Deck Post Lighting Residential Landscape Regarding Modern Garden Low Voltage L Balcony Design Outdoor