Intermatic HB51RC Outdoor Timer Instructions: A Comprehensive Guide
The Intermatic HB51RC is a popular choice for controlling outdoor lighting and other electrical devices. It provides a convenient and energy-efficient way to manage power usage, especially during seasonal changes. This article offers a detailed set of instructions for setting up and operating the Intermatic HB51RC outdoor timer, ensuring optimal functionality and longevity. It covers everything from initial setup to troubleshooting common issues.
Initial Setup and Installation
Before beginning the installation process, it is crucial to ensure the power supply to the intended circuit is switched off. This safety precaution minimizes the risk of electrical shock. Verify the power is off using a voltage tester.
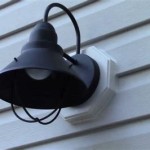
The Intermatic HB51RC is designed for outdoor use and should be installed in a location protected from direct rain and extreme weather conditions. Ideal locations include under eaves, within weatherproof enclosures, or in other sheltered areas. Proper placement will maximize the timer's lifespan and prevent premature failure.
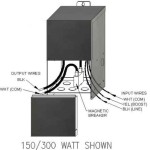
The HB51RC timer is typically wired in-line with the power supply to the device it controls. This means the power from the circuit breaker is routed through the timer, which then either allows or interrupts the flow of electricity to the appliance. Wiring instructions are typically provided with the timer itself, and these instructions should be followed meticulously. Generally, the black (hot) wire from the power source connects to one terminal on the timer, and another black wire runs from the timer to the device being controlled. The white (neutral) wire and the green (ground) wire are wired directly from the power source to the device, bypassing the timer.
If you are not comfortable working with electrical wiring, it is strongly advised to hire a qualified electrician to perform the installation. Improper wiring can lead to serious hazards, including electrical shock, fire, and damage to the timer and connected devices.
After wiring is complete, carefully secure the timer to a stable surface using appropriate mounting hardware. Ensure all connections are tight and that the wiring is properly insulated to prevent shorts. Once the timer is physically installed and wired, the power can be turned back on at the circuit breaker.
Programming the Timer
Programming the Intermatic HB51RC involves setting the current time and defining the on/off schedule for the connected device. The timer features a rotating dial with pins that represent 15-minute intervals. These pins are used to activate or deactivate the circuit at specific times.
To set the current time, rotate the timer dial until the arrow aligns with the current time of day. Ensure the AM/PM setting is correct. The timer typically indicates AM and PM with markings on the dial or a separate indicator.
To set the on/off times, push the pins outward for the periods when the device should be on and leave them inward for the periods when the device should be off. Each pin represents a 15-minute interval, allowing for precise scheduling. For example, to turn on the lights at 6:00 PM and turn them off at 10:00 PM, push the pins outward between those times.
The HB51RC timer also features a manual override switch. This switch allows you to temporarily override the programmed schedule and turn the device on or off regardless of the pin settings. This is useful for situations where you need to deviate from the regular schedule.
After setting the time and programming the schedule, allow the timer to run for a few cycles to ensure it is functioning correctly. Observe the connected device to verify that it turns on and off at the programmed times. If there are any discrepancies, recheck the time setting and pin positions.
Troubleshooting Common Issues
Even with careful installation and programming, issues can sometimes arise with the Intermatic HB51RC timer. Troubleshooting these issues requires a systematic approach to identify the root cause and implement the appropriate solution.
If the timer is not turning the device on or off at the programmed times, the first step is to verify the power supply to the timer. Check the circuit breaker to ensure it has not tripped. If the breaker has tripped, reset it and observe whether it trips again. If it repeatedly trips, there may be a short circuit in the wiring or a problem with the connected device.
If the power supply is good, the next step is to check the timer's settings. Ensure the current time is set correctly and that the pins are positioned correctly for the desired on/off times. It is also important to check the manual override switch to ensure it is not set to override the programmed schedule unintentionally.
Another common issue is a malfunctioning timer motor. If the timer dial is not rotating, the motor may be faulty and require replacement. Replacement motors are often available for purchase and can be installed relatively easily. However, if you are not comfortable working with electrical components, it is best to consult with a qualified electrician.
Sometimes, the timer may appear to be working correctly, but the connected device is not functioning. In this case, the problem may be with the device itself. Check the device's power cord, switch, and other components to ensure they are in good working order. If the device is faulty, it may need to be repaired or replaced.
If the timer is installed outdoors, it may be exposed to moisture and corrosion. Over time, this can damage the timer's internal components and lead to malfunctions. Inspect the timer regularly for signs of corrosion and take steps to protect it from the elements. This may include applying a protective coating or relocating the timer to a more sheltered location.
In cases where the timer functions intermittently, the issue could stem from loose wiring connections within the timer itself or at the connection points. A gentle tug on the wires (with the power OFF) can sometimes reveal a loose connection. Tightening these connections can often resolve the problem. If the issue persists, it may be necessary to inspect the internal components of the timer for signs of damage or wear.
If none of the above troubleshooting steps resolve the issue, it is recommended to contact Intermatic customer support for further assistance. They may be able to provide additional troubleshooting advice or recommend a qualified technician to inspect the timer.
Regular maintenance of the Intermatic HB51RC timer can help to prevent many of these issues and extend its lifespan. This includes periodically cleaning the timer to remove dust and debris, inspecting the wiring for signs of damage, and protecting the timer from exposure to extreme weather conditions.

Intermatic Outdoor Timer 6 Setting Dusk To Dawn Light Sensor Hb51rc New

Intermatic Outdoor Timer Model Hb51rc Dusk To Dawn Light Sensor

Intermatic Hb51rc Conserves Energy Six Settings Manual Override Outdoor Timer

Intermatic Outdoor Timer 6 Settings Dusk To Dawn Light Sensor Hb51rc Brand New 31 93 Pic

Intermatic Outdoor Timer 6 Settings Dusk To Dawn Light Sensor Hb51rc Brand New 31 93 Pic

Intermatic Outdoor Timer 6 Settings Dusk To Dawn Light Sensor Hb51rc Brand New

Intermatic Hb51rc Conserves Energy Six Settings Manual Override Outdoor Timer

Free Outdoor Timer All Weather Intermatic Model Hb51r Other Electronics Listia Com Auctions For Stuff

Intermatic Hb51rc Outdoor Timer 6 Settings Dusk To Dawn Ok1 For

Intermatic Outdoor Timer 6 Settings Dusk To Dawn Light Sensor Hb51rc Brand New 31 93 Pic
Related Posts