Installing an Outdoor Wall Light Fixture
Installing an outdoor wall light fixture enhances curb appeal, improves security, and adds functionality to outdoor spaces. While the process may seem daunting, homeowners with basic electrical knowledge and DIY skills can often complete this project themselves. However, if any uncertainty exists, consulting a qualified electrician is always recommended.
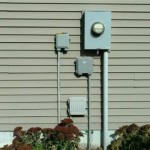
Before beginning the installation, gather the necessary tools and materials. These typically include a voltage tester, wire strippers, a Phillips head screwdriver, a flathead screwdriver, electrical tape, wire connectors, and the new light fixture. Ensure the power is turned off at the circuit breaker that controls the outdoor light's power supply before starting any electrical work.
The first step involves removing the old light fixture. Begin by unscrewing the mounting screws that secure the fixture to the wall. Once loosened, carefully pull the fixture away from the wall, exposing the electrical wiring. Using the voltage tester, double-check that the power is indeed off before proceeding.
Next, disconnect the wiring from the old fixture. Typically, there are two wires: a black (hot) wire and a white (neutral) wire. There may also be a green or bare copper wire for grounding. Carefully unscrew the wire connectors and separate the wires. If the existing fixture has a ground wire and the new fixture does not, the ground wire must be safely capped off and tucked away inside the junction box.
Now, prepare the new light fixture for installation. Familiarize yourself with the fixture's wiring schematic, which is usually included in the manufacturer's instructions. Identify the fixture's hot, neutral, and ground wires.
Connect the wires of the new fixture to the corresponding wires from the electrical box. Match the black wire from the fixture to the black wire from the electrical box, the white wire to the white wire, and the ground wire to the ground wire (if present). Use appropriately sized wire connectors and ensure a secure connection. Wrap each connection with electrical tape for added security.
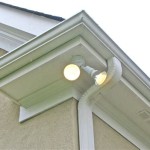
Once the wiring is complete, carefully tuck the wires back into the electrical box. Align the new fixture's mounting bracket with the electrical box and secure it to the wall using the provided screws. Ensure the fixture is mounted securely and level.
Attach the light fixture to the mounting bracket, following the manufacturer's instructions. This typically involves screwing the fixture onto the bracket or snapping it into place. Ensure the fixture is securely fastened.
Install the light bulb according to the fixture's specifications. Be sure to use a bulb with the correct wattage and base type. Avoid exceeding the maximum wattage recommended for the fixture.
After installing the bulb, turn the power back on at the circuit breaker. Test the new light fixture to ensure it functions correctly.
Different types of outdoor wall light fixtures require slightly different installation methods. For example, some fixtures may require mounting to a specially designed backplate, while others may have integrated LED lights that cannot be replaced.
Safety is paramount when working with electricity. Always double-check that the power is off before handling any wiring. If unsure about any aspect of the installation process, consult a qualified electrician.
Choosing the right outdoor wall light fixture is also crucial. Consider the desired style, the amount of light needed, and the fixture's weather resistance rating. Fixtures with a higher IP (Ingress Protection) rating offer greater protection against the elements.
Maintaining outdoor wall light fixtures is essential for their longevity and performance. Regularly clean the fixtures to remove dirt and debris, and inspect for any signs of damage. Replace any damaged components promptly.
Properly sealing the area around the fixture is important to prevent water intrusion. Use caulk or weather stripping to seal any gaps between the fixture and the wall. This helps protect the electrical components and prevents moisture damage.
Understanding local building codes is also essential before undertaking any electrical work. Some jurisdictions may require permits or inspections for outdoor lighting installations. Check with your local building department for specific requirements.
Various online resources and instructional videos can provide further guidance on installing outdoor wall light fixtures. These resources can offer helpful tips and visual demonstrations of the installation process.
Choosing energy-efficient lighting options can reduce energy consumption and lower electricity bills. Consider LED or CFL bulbs, which use significantly less energy than traditional incandescent bulbs.

How To Install Outdoor Wall Lighting Light Fixtures Mr Electric

Easy Outdoor Light Fixture Update 20 Minute Diy Upgrade

How To Install A Sconce Outdoors Bob Vila

How To Replace An Outdoor Light Fixture Facets Of Lafayette

How To Fit Outdoor Lights Lighting Electrical Security B Q

Exterior Wall Lights At Light11 Eu

Top Tips Replacing An Outdoor Wall Sconce Porch Daydreamer

How To Install A Porch Light Exterior Fixtures Lighting

How To Install An Exterior Electrical Box For A Light Fixture On The Wood Siding

How To Install Outdoor Wall Lighting For Home Improvement
Related Posts