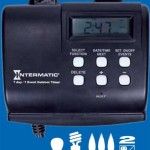
How to Set a Woods Outdoor Timer Manual: A Comprehensive Guide
Woods outdoor timers are essential tools for controlling the timing of outdoor lights, pumps, and other devices. Setting one manually is relatively straightforward, but it requires careful attention to detail. This comprehensive guide will walk you through the steps of setting a Woods outdoor timer manual, ensuring accurate and reliable operation.
Understanding the Controls
Most Woods outdoor timers have a combination of dials and switches used for programming. The dials typically include a 24-hour dial for setting the time and an interval dial for setting the length of the on and off periods. The switches are used to select the desired timing modes and options.
Step 1: Setting the Current Time
Locate the hour hand on the 24-hour dial and rotate it until it aligns with the current hour. Ensure that you adjust for Daylight Saving Time if necessary.
Step 2: Setting the Interval On Time
The interval dial has two pointers labeled "ON" and "OFF." Rotate the "ON" pointer to the desired start time of the on period. For example, if you want the device to turn on at 7:00 AM, align the "ON" pointer with 07:00 on the dial.
Step 3: Setting the Interval Off Time
Similarly, rotate the "OFF" pointer to the desired end time of the on period. Continuing the previous example, if you want the device to turn off at 10:00 PM, align the "OFF" pointer with 22:00 on the dial.
Step 4: Setting the Timing Mode
Woods outdoor timers typically offer multiple timing modes. The most common modes are:
- 24-hour timer: The device operates on a 24-hour cycle, repeating the on and off intervals daily.
- 7-day timer: The device offers separate schedules for each day of the week.
- Random timer: The device turns the device on and off at random intervals within a specified time range.
Choose the desired timing mode using the appropriate switch.
Step 5: Adjusting the Interval Settings
The interval dial can be adjusted to change the duration of the on and off periods. Turn the dial clockwise or counterclockwise to increase or decrease the interval time.
Step 6: Enabling and Disabling the Timer
Once the settings are configured, use the main on/off switch to enable or disable the timer. When the timer is enabled, it will begin operating according to the programmed schedule.
Tips for Effective Use
- Double-check your settings carefully before enabling the timer.
- Consider using a surge protector to protect the timer from voltage fluctuations.
- Keep the timer in a weatherproof enclosure or install it indoors.
- Adjust the interval settings as needed to accommodate seasonal changes.
Conclusion
Setting a Woods outdoor timer manual is a straightforward process but requires attention to detail. By following the steps outlined in this guide, you can ensure that your timer operates accurately and reliably, providing convenient control over your outdoor lighting and devices.

Woods Outdoor Digital Timer Instructions Plants On Walls

Outside Timers

Woods 50016 Outdoor Digital Block Heater Timer User Manual

Woods 50013wd Instruction Manual

Woods 24 Hour Outdoor Timer Qc Supply

Woods 15 Amp 24 Hour Outdoor Plug In Heavy Duty Dual Mechanical Timer Black 50012wd The Home Depot

Woods Timers Instructions 50015 Wion Setup

Woods 50016 Outdoor Digital Block Heater Timer User Manual Set Up Programming Guide

Woods 50122wd 50121wd Instructions Manualzz

How To Use The Woods Noma Digital Outdoor Timer
Related Posts