How To Set a Timer For Outdoor Lights
Enhancing the security and aesthetic appeal of residential or commercial properties often involves the strategic implementation of outdoor lighting. Managing these lights efficiently, both for energy conservation and convenience, necessitates the use of timers. This article will detail the different methods for setting timers for outdoor lights, covering various timer types and providing step-by-step instructions for optimal configuration.
The purpose of using a timer for outdoor lights extends beyond mere convenience. It offers a practical approach to deterring potential intruders, simulating occupancy even when the property is vacant. Furthermore, scheduled lighting reduces energy consumption by ensuring lights are only active during necessary periods, contributing to lower electricity bills. In addition, timers can automate seasonal lighting displays, simplifying holiday decorations and ensuring consistent operation.
Understanding the Different Types of Outdoor Light Timers
Before configuring a timer for outdoor lights, it's crucial to understand the available types and their functionalities. These timers can be broadly categorized into mechanical, digital, and smart timers, each offering distinct advantages and disadvantages.
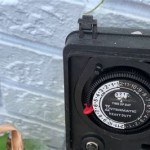
Mechanical Timers: These are the simplest and most affordable options. They typically feature a rotating dial with pins that can be pushed in or pulled out to designate on and off times. Mechanical timers are generally reliable and straightforward to use, requiring no programming beyond setting the current time and desired on/off intervals. Their primary drawback is a limited level of precision; intervals usually are restricted to 15-minute or 30-minute increments. They also lack advanced features such as sunrise/sunset settings or the ability to program multiple schedules.
Digital Timers: Digital timers offer greater flexibility and precision compared to mechanical timers. They utilize a digital display and buttons for programming, allowing users to set specific on and off times, often to the minute. Many digital timers also include features such as multiple programmable schedules, countdown timers, and random on/off settings to simulate occupancy more effectively. Digital timers require power to operate and often include a battery backup to maintain settings during power outages. Understanding the programming interface is essential, but once mastered, they provide a significant upgrade in functionality over mechanical timers.
Smart Timers: Smart timers represent the most advanced option, offering connectivity via Wi-Fi or Bluetooth to allow control through a smartphone app or smart home system. These timers frequently include features like sunrise/sunset settings that automatically adjust on/off times based on geographic location, integration with weather forecasts to optimize lighting schedules, and remote control capability. Smart timers can be programmed to respond to various triggers, such as motion detection, and can be integrated with other smart home devices for comprehensive automation. The initial setup process may be more complex, involving network connections and account creation, but the added convenience and functionality make them a worthwhile investment for smart home enthusiasts.
Setting Up a Mechanical Timer
Installing and configuring a mechanical timer is a relatively simple process. The following steps outline the procedure:
Step 1: Installation: Most mechanical timers are designed to be installed either directly into an outlet or as part of an extension cord. Ensure the timer is properly rated for outdoor use and can handle the wattage of the lights that will be plugged into it. Plug the timer into the outlet and then plug the outdoor lights into the timer.
Step 2: Setting the Current Time: Locate the rotating dial on the timer. This dial typically has numbers representing the hours of the day (1-12 or 1-24, depending on the model). Rotate the dial until the current time of day aligns with the indicator mark on the timer. The indicator mark might be a small arrow or a line on the timer face.
Step 3: Setting the On/Off Times: Identify the pins or segments surrounding the dial. These pins correspond to specific time intervals. To set the timer to turn on, push the pins outward (or inward, depending on the timer design) for the desired on time. To set the timer to turn off, leave the pins in their default position for the desired off time. For example, if you want the lights to turn on at 6:00 PM and turn off at 6:00 AM, push the pins outward for the corresponding hours. Note that the precision is limited by the interval spacing of the pins, usually 15 or 30 minutes.
Step 4: Testing: After setting the on/off times, test the timer to ensure it is functioning correctly. Allow the timer to run through at least one complete cycle to verify that the lights turn on and off at the programmed times. Adjust the pin settings as needed to fine-tune the schedule.
Programming a Digital Timer
Setting up a digital timer requires understanding the timer's interface and menu options. Here's a general guide:
Step 1: Installation: Similar to mechanical timers, digital timers are available in outlet and extension cord formats. Verify that the timer is suitable for outdoor use and capable of handling the wattage of the lights. Plug the timer into the outlet, then plug the lights into the timer.
Step 2: Setting the Current Time and Day: Press and hold the "Set" or "Clock" button until the display begins to flash. Use the "+" and "-" buttons (or up and down arrows) to adjust the hour and minute. Press the "Set" or "Clock" button again to confirm the time and move to setting the day of the week. Use the "+" and "-" buttons to select the correct day and press "Set" or "Clock" to finalize the settings. Refer to the timer's manual for specific button functions as they may vary by model.
Step 3: Programming the On/Off Times: Press the "Program" or "Timer" button to enter the programming mode. The display will typically show "1 ON" or a similar indicator representing the first on time setting. Use the "+" and "-" buttons to set the desired hour and minute for the first on time. Press the "Program" or "Timer" button again to move to the first off time setting ("1 OFF"). Set the desired hour and minute for the first off time using the "+" and "-" buttons. Some timers allow setting different schedules for different days of the week. If supported, use the appropriate buttons to select the days you want the schedule to apply to.
Step 4: Setting Additional Schedules: Many digital timers allow for multiple on/off schedules. Repeat step 3 to program additional schedules as needed. The number of available schedules varies depending on the timer model.
Step 5: Testing: After programming the schedules, test the timer to ensure it is functioning correctly. Allow it to run through a complete cycle to verify that the lights turn on and off at the programmed times. Adjust the settings as necessary to fine-tune the schedule. Some timers have a "Manual Override" button that allows you to temporarily turn the lights on or off without affecting the programmed schedule.
Configuring a Smart Timer
Setting up a smart timer involves connecting it to a Wi-Fi network and configuring it through a smartphone app. Here’s a typical setup procedure:
Step 1: Installation: Install the smart timer in the desired location, ensuring it is suitable for outdoor use and can handle the wattage of the lights. Plug the lights into the smart timer and the timer into an outlet.
Step 2: Download and Install the App: Download the corresponding app for the smart timer from the App Store (iOS) or Google Play Store (Android). Create an account if required.
Step 3: Connect to Wi-Fi: Follow the instructions in the app to connect the smart timer to the home Wi-Fi network. This usually involves putting the timer into pairing mode (often by pressing a button on the device) and then selecting the Wi-Fi network and entering the password in the app. Ensure the Wi-Fi network is stable and has a strong signal strength in the location where the timer is installed. Some timers support Bluetooth setup as an alternative to Wi-Fi.
Step 4: Setting the Schedule: Once the timer is connected to Wi-Fi, use the app to set the desired on/off schedules. Many smart timers offer advanced scheduling options, such as sunrise/sunset settings, which automatically adjust the on/off times based on the user's location and the time of year. Some apps also allow for custom schedules for different days of the week and the ability to create multiple schedules.
Step 5: Remote Control and Automation: The app allows for remote control of the lights, meaning you can turn them on or off from anywhere with an internet connection. Many smart timers also support integration with smart home systems like Amazon Alexa or Google Assistant, allowing you to control the lights using voice commands. Explore the app's settings to configure other features, such as motion detection triggers or integration with other smart devices.
Step 6: Testing: Test the smart timer to ensure it is functioning correctly. Manually turn the lights on and off through the app and verify that the programmed schedules are being followed. Adjust the settings as necessary to fine-tune the schedule and ensure optimal performance.
By understanding the different types of timers available and following the appropriate setup instructions, users can effectively manage their outdoor lighting, enhancing security, conserving energy, and simplifying their routines.

How To Adjust Your Timer For Daylight Savings Spring Lexington Outdoor Lighting

How To Set A Plug Timer Mechanical Digital Switches

How To Use A Timer Switch For Lights

How To Put Outdoor Lights On A Timer Electronicshub

Ge 24 Hour Outdoor Plug In Mechanical Timer 15138 The Home Depot

How To Install A Timer Switch In Outdoor Lighting Doityourself Com

How To Program An Outdoor Light Timer Quora

Our Home From Scratch

Noma Light Timer Instructions Hunker

Tm02 Plug In Timer Indoor Mechanical Clock For Garden Lights Transform Kings Outdoor Lighting