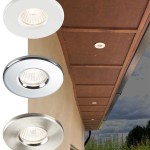
How To Replace Outdoor Ground Lights In Ceiling
Outdoor ground lights installed in ceilings, such as those found in covered porches or soffits, enhance the aesthetic appeal and safety of a home's exterior. Over time, these lights may require replacement due to bulb failure, fixture damage, or the desire for a style update. This guide provides a comprehensive overview of the replacement process.
1. Safety First: Disconnect the Power
Before undertaking any electrical work, ensuring the power supply to the fixture is completely disconnected is paramount. Locate the corresponding circuit breaker in the electrical panel and switch it off. For added safety, use a non-contact voltage tester to double-check that no power is flowing to the wires connected to the light fixture.
2. Accessing the Fixture
Depending on the ceiling's height and the fixture's location, a ladder or scaffolding may be required to safely access the light. Securely position the ladder or scaffolding on a stable surface. Once safely elevated, carefully examine the fixture to understand its mounting mechanism. Common methods include screws, clips, or springs.
3. Removing the Old Fixture
Once the mounting mechanism is identified, carefully disengage it. For screw-mounted fixtures, use a screwdriver to remove the retaining screws. If clips or springs are involved, gently press or release them to detach the fixture from the ceiling. Slowly lower the fixture, taking care not to strain the wiring. Once accessible, disconnect the wires from the fixture. Most connections are secured with wire nuts; these can be removed by twisting them counterclockwise. Take note of the wire colors and their corresponding connections for later reinstallation.
4. Preparing the New Fixture
Unpack the new fixture and carefully read the manufacturer's instructions. These instructions often contain specific details regarding wiring and installation procedures. Ensure the new fixture is compatible with the existing wiring and the power supply's voltage. Prepare the new fixture for wiring by removing any protective covers or plugs from the wire connectors.
5. Connecting the New Fixture
Connect the wires of the new fixture to the existing wiring in the ceiling, matching the wire colors according to the manufacturer's instructions and the notes taken during the removal of the old fixture. In most standard installations, black wires connect to black (hot), white wires connect to white (neutral), and green or bare copper wires connect to green or bare copper (ground). Securely tighten the wire nuts to ensure a solid connection.
6. Mounting the New Fixture
Once the wiring is complete, carefully raise the new fixture into position and secure it to the ceiling using the appropriate mounting method. Ensure the fixture is flush with the ceiling surface and securely fastened. If screws are used, tighten them firmly but avoid overtightening, which could damage the fixture or the ceiling material.
7. Testing the Installation
After the fixture is securely mounted, restore power to the circuit by switching the circuit breaker back on. Test the new fixture by operating the switch. If the light illuminates correctly, the installation is complete. If the light does not function, immediately disconnect the power at the circuit breaker and double-check all connections. If the problem persists, consult a qualified electrician.
Replacing outdoor ground lights in ceilings involves a series of straightforward steps. By following these instructions carefully and prioritizing safety precautions, homeowners can successfully upgrade their outdoor lighting and enhance the beauty and security of their homes. However, when dealing with electrical components, exercising caution is always recommended. If any uncertainty arises during the process, seeking the assistance of a qualified electrician is advisable.
Different types of fixtures may utilize varying mounting systems and wiring configurations. Always consult the manufacturer’s instructions for guidance specific to the chosen fixture. This ensures proper installation and prevents damage to the fixture or the electrical system. Specific local building codes may also apply and should be adhered to for compliance and safety.

How To Install A Ceiling Light Fixture Diy Family Handyman

How To Remove An Outdoor Light Fixture From A Wall Ehow

What Light Fittings Should We Install Outdoors When It Rains

Replace Recessed Light With A Pendant Fixture

The 3 Best Smart Outdoor Lights For Backyards Of 2024 Reviews By Wirecutter

Buy Gesto Super Bright 40 Meter 131 Feet Waterproof Led Ceiling Light For False Cove Strip Home Decoration Diwali Modes Changing Lead Included Multicolor At Best S In

19 Stylish Outdoor Lighting Ideas The Best Patio

Indoor Outdoor Lighting Fixture Installation In Ma Heritage Home Service

Solar Disc Powered Changing 8 Led Disk Path Ground Lights W Diffusing Lens Outdoor Indoor Ip65 Waterproof Garden Landscape Spike Yard Bright White Light 4 Pack Com

How To Install Landscape Lighting The Home Depot