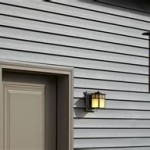
How To Install Outdoor Lighting On Siding
Installing outdoor lighting enhances a property's aesthetic appeal, improves security, and extends the usability of outdoor spaces. While professional installation is an option, a homeowner with basic electrical knowledge and DIY skills can successfully install outdoor lighting on siding. This article provides a comprehensive guide to the process, covering planning, material selection, installation steps, and safety precautions.
Planning the Outdoor Lighting Project
Before commencing the physical installation, careful planning is crucial. This phase involves determining the purpose of the lighting, selecting suitable fixtures, and mapping out the wiring layout. A well-defined plan minimizes errors and ensures the desired outcome.
First, define the objectives of the outdoor lighting. Is the primary goal to illuminate walkways for safety, highlight architectural features, or create an inviting ambiance for outdoor entertaining? The intended use will dictate the type, placement, and intensity of the lighting fixtures.
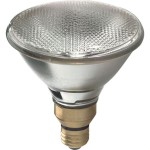
Next, select appropriate lighting fixtures. Options range from spotlights and floodlights to path lights, wall sconces, and string lights. Consider factors such as energy efficiency (LED options are often preferred), light output (lumens), color temperature (warm or cool light), and style to complement the house's architecture. Ensure the chosen fixtures are rated for outdoor use and suitable for the climate.
Develop a detailed wiring plan. This involves determining the power source (existing outdoor outlet or a new circuit), the routing of the wiring, and the placement of junction boxes. Consider the distance between the power source and the fixtures, as well as any obstacles that might impede wiring. Accurately measure and mark the desired locations for the lights on the siding.
Check local building codes and regulations regarding outdoor lighting. Some jurisdictions may have restrictions on light pollution, fixture placement, or electrical work. Obtain any necessary permits before starting the project.
Finally, gather all the necessary tools and materials. This includes the lighting fixtures, wiring (rated for outdoor use), weatherproof junction boxes, siding mounting blocks, drill, screwdriver, wire strippers, wire connectors, voltage tester, and safety equipment (gloves, safety glasses).
Preparing the Siding for Lighting Installation
Properly preparing the siding is essential for a secure and weatherproof installation. This typically involves using mounting blocks designed specifically for attaching fixtures to siding.
Identify the type of siding on the house (e.g., vinyl, wood, fiber cement). The installation method and the type of mounting block required will vary depending on the siding material. Vinyl siding, in particular, requires specific techniques to avoid cracking or warping.
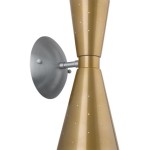
Select the appropriate siding mounting blocks. These blocks provide a flat, stable surface for attaching the lighting fixture and help to prevent water intrusion. Choose blocks that are compatible with the siding profile and the size of the fixture base. Many mounting blocks are paintable, allowing them to be matched to the siding color.
Carefully mark the locations for the mounting blocks on the siding, based on the wiring plan. Use a level to ensure the blocks are aligned vertically and horizontally. Precision in marking is crucial for a professional-looking installation.
If installing on vinyl siding, use a utility knife or specialized vinyl siding cutting tool to create a hole slightly smaller than the mounting block's opening. The vinyl siding should flex slightly to accommodate the block. For wood or fiber cement siding, drill pilot holes to prevent splitting the siding.
Apply a bead of exterior-grade caulk to the back of the mounting block, around the perimeter of the opening. This will create a watertight seal between the block and the siding. Press the block firmly against the siding, ensuring good contact.
Secure the mounting block to the siding using screws that are appropriate for the siding material. For vinyl siding, use self-tapping screws designed for vinyl. For wood or fiber cement siding, use wood screws or self-tapping screws. Avoid overtightening the screws, as this can damage the siding.
Wiring and Connecting the Outdoor Lighting Fixtures
The wiring phase requires careful attention to detail and adherence to electrical safety standards. Disconnect the power supply before commencing any wiring work.
Turn off the power to the circuit at the breaker box. Use a voltage tester to verify that the power is off before touching any wires. Safety is paramount when working with electricity.
Run the wiring from the power source to the junction box located behind the mounting block. Use weatherproof wiring (e.g., UF cable) that is rated for direct burial if running the wire underground. Protect the wiring with conduit where it is exposed to physical damage.
Connect the wires in the junction box using appropriate wire connectors (e.g., wire nuts, push-in connectors). Follow the color-coding convention: black (hot) to black, white (neutral) to white, and green (ground) to green or bare copper. Ensure the connections are secure and insulated.
Attach the lighting fixture to the mounting block. Feed the fixture wires through the hole in the mounting block and connect them to the wires in the junction box, using the same color-coding convention. Secure the fixture to the mounting block using screws or other fasteners provided with the fixture.
Carefully tuck the wires into the junction box, ensuring they are not pinched or strained. Close the junction box cover securely to protect the wiring from the elements. The junction box should be weatherproof.
Test the lighting fixture by turning the power back on at the breaker box. If the fixture does not work, double-check the wiring connections and the power supply. Consult with a qualified electrician if you are unable to resolve the issue.
Install a Ground Fault Circuit Interrupter (GFCI) outlet or breaker for the outdoor lighting circuit. GFCIs protect against electrical shock and are required by code for outdoor circuits.
Once the lighting is functioning correctly, conceal any exposed wiring with conduit or other protective materials. Ensure all connections are weatherproof and secure.
Regularly inspect the outdoor lighting fixtures and wiring for damage or wear. Replace any damaged components promptly to maintain safety and functionality. Trimming any vegetation that obstructs the lighting fixture.
Properly dispose of all waste materials, including old fixtures, wiring scraps, and packaging. Follow local regulations for disposal of electronic waste.
Take pictures of the wiring and fixture placement before concealing them. This visual record can be helpful for future maintenance or repairs. It can also serve as a reference if you decide to install additional lighting fixtures in the future.
If using low-voltage lighting, a transformer will be required to convert standard household voltage (120 volts) to a lower voltage (typically 12 or 24 volts). Place the transformer in a weatherproof enclosure and connect it to a GFCI-protected outlet.
Consider using a photocell or timer to automatically turn the outdoor lights on and off. This can improve energy efficiency and convenience. Photocell sensors detect ambient light levels and turn the lights on at dusk and off at dawn. Timers allow you to set specific on and off times.

New House Siding How Do I Install Outdoor Lights On This Bracket Doityourself Com Community Forums

How To Add A Light Fixture Vinyl Siding Electrical Box Aka J Block

How To Install A Porch Light

Top Tips Replacing An Outdoor Wall Sconce Porch Daydreamer

Replacing An Outdoor Light Fixture

Vinyl Siding Lights How To Mount Using A Mounting Block Diy

Exterior Light On Vinyl Siding

Installing An Exterior Light On Vinyl Siding With A Mounting Plate

Replacing An Outdoor Light Fixture

Installing An Outdoor Wall Mounted Light Doityourself Com Community Forums
Related Posts