How To Change Outdoor LED Lights
Outdoor LED lights offer numerous advantages, including energy efficiency, longevity, and durability. However, like any light fixture, they eventually require replacement. Whether due to malfunction, damage, or a desire for an aesthetic upgrade, changing outdoor LED lights is a manageable task for most homeowners with basic DIY skills. This article outlines the process, emphasizing safety precautions and providing a step-by-step guide for a successful replacement.
Safety First
Prioritizing safety is paramount when working with any electrical fixture. Before commencing any work, always disconnect the power supply to the light fixture. This can be achieved by turning off the circuit breaker at the main electrical panel. Verify the power is off by testing the light switch. Using a non-contact voltage tester is recommended to double-check the absence of electricity at the fixture itself. This ensures no risk of electric shock during the replacement process.
Gathering Necessary Tools and Materials
Having the right tools and materials on hand simplifies the process and ensures a smooth installation. Typically, a ladder, screwdrivers (both Phillips and flathead), pliers, wire strippers, wire connectors, and electrical tape will be sufficient. It is crucial to choose replacement LED lights that are compatible with the existing fixture and wiring. Check the voltage and wattage requirements to ensure proper functionality and avoid potential damage. Having these items prepared beforehand will minimize interruptions and streamline the replacement procedure.
Removing the Old LED Light
Once the power is disconnected and tools are assembled, the next step is removing the old LED light. The exact method will vary depending on the fixture type. Some fixtures are secured with screws, while others may have clips or other fastening mechanisms. Carefully examine the fixture and identify the appropriate method for detachment. If screws are present, use the appropriate screwdriver to loosen and remove them. For clips, gently pry them open to release the fixture. Throughout this process, handle the fixture with care to avoid damage and maintain personal safety.
After detaching the fixture, disconnect the wiring. Typically, this involves unscrewing wire connectors that join the fixture wires to the house wiring. Take note of the wiring configuration, particularly the color coding, as this will be crucial when installing the new LED light. If the existing wiring appears damaged or frayed, it's advisable to replace it with a new section of appropriately rated wire. Use wire strippers to carefully remove a small section of insulation from the ends of the wires, exposing the bare copper for connection to the new fixture.
Installing the New LED Light
With the old fixture removed, the next step is installing the new LED light. Begin by connecting the wires of the new fixture to the house wiring, following the same color coding observed during the removal process. Secure the connections using appropriately sized wire connectors and ensure the wires are firmly twisted together within the connector. Wrap electrical tape around the connector as an added layer of insulation and protection.
After the wiring is complete, secure the new LED light fixture to its mounting base. This typically involves aligning the fixture with the mounting holes and securing it with screws or clips, mirroring the removal process. Ensure the fixture is securely attached to prevent movement or detachment. Once the fixture is secured, restore power to the circuit by turning the breaker back on at the main electrical panel. Test the new LED light to confirm proper functionality.
Troubleshooting
If the new LED light doesn't function correctly after installation, double-check the wiring connections to ensure they are secure and correctly color-coded. Verify that the power switch is turned on and that the circuit breaker is engaged. If the problem persists, consult the manufacturer's instructions or seek assistance from a qualified electrician. Attempting further troubleshooting without adequate knowledge can be dangerous and may damage the fixture or wiring. A qualified electrician possesses the expertise and tools to diagnose and resolve complex electrical issues safely.
Disposing of Old LED Lights
LED lights contain electronic components that should not be disposed of in regular household waste. Many municipalities offer recycling programs for electronic waste, which is the preferred method for disposing of old LED lights. Check with your local waste management authority for information on proper disposal procedures. This environmentally responsible practice contributes to the reduction of electronic waste and helps conserve resources.
Upgrading to Smart LED Lights
Consider upgrading to smart LED lights for added convenience and control. Smart LED lights can be controlled remotely via smartphone apps, allowing for customized lighting schedules, dimming capabilities, and even color changes. Some smart LED lights integrate with home automation systems, offering further integration and control options. While smart LED lights typically involve a higher initial investment, they offer long-term benefits in terms of energy savings and enhanced functionality.

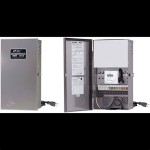
Altair Lighting Led Lantern And Driver Replacement Ledsupply Blog

How To Replace Exterior Recessed Light Fixture

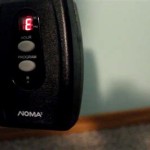
How To Fix A Blinking Outdoor Led Light

Your Guide To Outdoor Rgb Led Lighting Perspectives

How To Fix A Blinking Outdoor Led Light

Replace Flood Lights With Led Equivalent Saves Lots Of Electricity

Led Retrofit Kit For Outdoor Lighting Fixtures

Ustellar Outdoor Led Color Changing Rgb Strip Lights

Home Decorators Collection Outdoor 24 Ft Plug In Edison Bulb Led String Light Color Change With Timer And Sensor Tw05l003wrgb12 The Depot

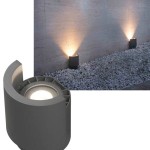
Led Replacement Mr16 Gu5 3 Light Bulb For Our Outdoor Landscape Low Voltage Lights