How To Program An Outdoor Timer
Outdoor timers are valuable tools for automating the operation of various outdoor electrical devices. From landscape lighting and holiday decorations to pool pumps and fountains, these timers offer convenience and energy savings by controlling when power is supplied to connected appliances. Programming an outdoor timer involves configuring its settings to match desired operational schedules. The specific programming process varies depending on the type of timer, but the underlying principles remain consistent. This article provides a comprehensive overview of how to program different types of outdoor timers, addressing both digital and mechanical models.
Before initiating the programming process, it is crucial to identify the type of outdoor timer being used. Broadly, they fall into two categories: digital timers and mechanical timers. Digital timers feature an electronic display and buttons for setting the time and on/off schedules. Mechanical timers, on the other hand, utilize a dial with pins or trippers that physically activate and deactivate the power switch. Understanding the timer type is the first step in accurately programming it.
Understanding Digital Outdoor Timers
Digital outdoor timers are generally more precise and versatile than their mechanical counterparts. They commonly offer multiple on/off settings per day and often include features such as a countdown timer, random on/off functions for security, and the ability to handle different day-of-week schedules. Programming a digital timer involves navigating its interface using the available buttons.
The first step in programming a digital outdoor timer is typically setting the current time and day. This is essential for the timer to accurately follow the programmed schedule. The process usually involves pressing and holding a designated button (often labeled "Set," "Clock," or "Time") until the display flashes. Then, using the "+" and "-" buttons (or similar directional controls), the user adjusts the hours and minutes. After the time is set, the day of the week is similarly adjusted using the same buttons. Once the current time and day are accurately displayed, the "Set" button is pressed again to save the settings.
Next, the desired on/off schedules are programmed. This usually involves accessing the timer's program settings by pressing a button labeled "Program," "Schedule," or "On/Off." The display will then prompt the user to set the first "on" time. Similar to setting the current time, the user adjusts the hour and minute for the desired activation time. Once the "on" time is set, the user will be prompted to select the days of the week that the schedule should apply to. Options often include individual days, weekdays only, weekends only, or a combination thereof. The same process is then repeated to set the first "off" time and its corresponding days of the week.
Many digital timers allow for multiple on/off schedules to be programmed. This can be useful for controlling different devices at various times throughout the day. To add additional schedules, the user simply navigates to the next available program slot and repeats the process of setting the "on" time, "off" time, and days of the week. After all desired schedules have been programmed, the user exits the program settings, ensuring that the timer is set to the "Auto" or "Run" mode for the programmed schedules to take effect. Some digital timers also include a manual override function, allowing the user to temporarily turn the connected device on or off without affecting the programmed schedule. This can be useful when needing to bypass the timer's schedule for a specific situation.
Understanding Mechanical Outdoor Timers
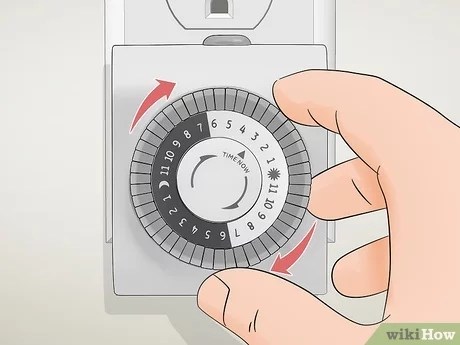
Mechanical outdoor timers, while less sophisticated than digital models, are generally simpler to use and can be more robust in certain outdoor environments. They typically feature a rotating dial with a series of pins or trippers that can be pushed in or pulled out to represent "off" and "on" positions, respectively.
The programming process for a mechanical timer involves setting the current time and configuring the pins or trippers to match the desired schedule. The first step is to set the current time on the dial. This usually involves rotating the dial until the marker indicating the current time aligns with the arrow or indicator on the timer's face. The dial is typically marked with hours, either in a 12-hour or 24-hour format. It is important to accurately set the current time for the timer to function correctly.
Once the current time is set, the pins or trippers are configured to establish the on/off schedule. Each pin or tripper corresponds to a specific time interval, typically 15 or 30 minutes. To set an "on" time, the corresponding pin or tripper is pushed outwards or left in its default position. To set an "off" time, the corresponding pin or tripper is pushed inwards. The area between an "on" pin/tripper and an "off" pin/tripper represents the period when the connected device will be powered. For example, if a device needs to be turned on at 6 PM and off at 10 PM, the pins/trippers corresponding to those times would be configured accordingly.
It is important to note that mechanical timers typically only allow for one on/off schedule per day. They lack the flexibility of digital timers in terms of setting multiple schedules or different day-of-week configurations. After the pins or trippers have been configured to match the desired schedule, the timer is plugged into the outlet and the device is plugged into the timer. The timer will then automatically turn the device on and off according to the configured schedule. Some mechanical timers feature a manual override switch, allowing the user to temporarily bypass the programmed schedule. This can be useful for situations where the device needs to be turned on or off outside of the regular schedule.
Troubleshooting Common Issues
Despite their relative simplicity, outdoor timers can sometimes present operational challenges. Troubleshooting these issues effectively requires systematic diagnosis.
One common issue is a timer failing to switch the connected device on or off as programmed. In digital timers, this could be due to incorrect time settings, incorrect schedule programming, or the timer being set to the wrong mode (e.g., "Off" instead of "Auto"). Verifying the time, schedule, and mode settings is often the first step in resolving this issue. In mechanical timers, the problem could be due to the pins or trippers being incorrectly positioned, the dial being misaligned with the current time, or a mechanical failure within the timer itself. Careful examination of the pin/tripper configurations and the dial alignment is essential.
Another potential issue is a timer operating erratically or unscheduled activations/deactivations. This can be caused by power fluctuations, electromagnetic interference, or internal component failure. For digital timers, resetting the timer to its factory default settings and reprogramming it can sometimes resolve the issue. For mechanical timers, inspecting the timer for any physical damage or debris that might be interfering with the dial's rotation is important. Testing the timer in a different outlet or location may also help determine if power fluctuations or interference are the cause. Outdoor timers are exposed to the elements, so inspecting the timer's enclosure for water damage should also be considered, as this can cause short circuits or other malfunctions.
If the timer is completely unresponsive, the problem is likely related to a power supply issue. Ensure that the timer is properly plugged into a functioning outlet. Testing the outlet with another device can confirm whether the outlet is providing power. If the outlet is functioning correctly, the internal fuse within the timer may have blown. Replacing the fuse with one of the correct amperage may restore functionality, but if the fuse blows again immediately, it suggests a more serious internal problem requiring replacement of the timer.

Outdoor Digital Timer How To Set Up The Programs

3 Easy Ways To Use A Light Timer Wikihow

How To Program The Intermatic Hb880r Outdoor Plug In Timer
How To Set A Plug Timer Mechanical Digital Switches

How To Program And Set Time On The Westinghouse Automatic Electric Timer

Instructions On How To Program A Simple Noma Stanley Outdoor Timer

Dewenwils Outdoor Digital Timer 7 Day Programmable Plug In With 3 Grounded S For Landscape String Light

Outdoor Digital Timer Photocell Mode Programming

How To Program The Hb31k Outdoor Plug In Timer From Intermatic

Bn Link 7 Day Heavy Duty Outdoor Digital Stake Timer 6 S

