```html
Homemade Outdoor Light Fixtures: Illuminating Your Space with DIY Charm
Outdoor lighting enhances the aesthetic appeal of a property, extending its usability into the evening hours. Purchasing professionally manufactured fixtures can be expensive, and often lack the unique character that many homeowners desire. Constructing homemade outdoor light fixtures provides an opportunity for personalization, cost savings, and sustainable design practices. This endeavor requires careful planning, material selection, and adherence to safety guidelines, transforming ordinary outdoor spaces into inviting and well-lit environments.
Planning and Design Considerations
Before embarking on the construction of homemade outdoor light fixtures, a comprehensive plan is essential. This plan involves evaluating the specific lighting needs of the outdoor space, selecting appropriate materials, and developing a detailed design that incorporates both functionality and aesthetic appeal. The scope of the project will dictate the time commitment, budget, and required skill level.
The first step is to assess the areas requiring illumination. Common areas include pathways, patios, gardens, and building entrances. Identifying the purpose of the lighting in each area helps determine the required light intensity and pattern. Pathway lighting, for instance, typically requires softer, diffused light to guide foot traffic, while security lighting near entrances needs to be brighter and cover a wider area.
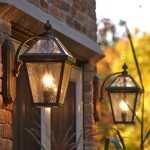
Next, consider the overall aesthetic of the outdoor space. The design of the light fixtures should complement the existing architectural style and landscaping. Rustic designs using reclaimed wood might suit a cottage garden, while sleek, modern designs using metal and glass may be more appropriate for a contemporary home. It's also crucial to consider the scale of the fixtures relative to their surroundings. Overly large fixtures can overwhelm a small space, while undersized fixtures may not provide adequate illumination.
Safety is paramount during the design phase. All outdoor electrical connections must be weatherproof and comply with local electrical codes. The fixtures themselves should be designed to withstand exposure to the elements, including rain, snow, and wind. Using low-voltage lighting systems can significantly reduce the risk of electrical shock. Proper grounding is also essential to ensure safe operation.
Finally, consider the environmental impact of the design. Opting for energy-efficient LED bulbs reduces energy consumption and prolongs bulb life. Choosing sustainable materials, such as reclaimed wood or recycled metal, minimizes the project’s environmental footprint. Designing fixtures that minimize light pollution by directing light downward and avoiding excessive brightness is also an important consideration.
Material Selection and Construction Techniques
The selection of appropriate materials is crucial for the durability, functionality, and aesthetic appeal of homemade outdoor light fixtures. Materials must be weather-resistant, easy to work with, and compatible with the chosen design. Common materials include wood, metal, glass, and concrete, each offering unique advantages and disadvantages.
Wood is a versatile and readily available material that can be used to create a wide range of light fixture designs. Pressure-treated lumber is recommended for outdoor use to prevent rot and decay. Cedar and redwood are naturally rot-resistant options, but they are generally more expensive. Wood fixtures can be stained or painted to match the existing décor. When working with wood, ensure proper sealing and weatherproofing to protect it from moisture damage.
Metal is a durable and weather-resistant material that can be used to create sleek and modern light fixtures. Aluminum is a lightweight and corrosion-resistant option, while steel is stronger but requires powder coating or painting to prevent rust. Copper and brass offer a unique aesthetic appeal but are more expensive. Metal fixtures can be fabricated using welding, cutting, and bending techniques. It is crucial to use appropriate safety equipment, such as safety glasses and gloves, when working with metal.
Glass can be used to diffuse light and create interesting visual effects. Tempered glass is recommended for outdoor use due to its increased strength and resistance to shattering. Glass can be cut and shaped using specialized tools. Consider using stained glass or textured glass to add visual interest to the fixtures. Ensure that the glass is securely mounted within the fixture to prevent it from falling or breaking.
Concrete is a durable and versatile material that can be used to create unique and contemporary light fixtures. Concrete fixtures can be cast in molds to create various shapes and sizes. Concrete can be stained or painted to match the surrounding environment. When working with concrete, it is crucial to use appropriate safety equipment, such as gloves and a dust mask. Concrete fixtures can be heavy, so ensure that they are properly supported.
Construction techniques will vary depending on the chosen materials and design. Wood fixtures may require cutting, sanding, and joining techniques. Metal fixtures may require welding, cutting, and bending. Glass fixtures may require cutting, shaping, and mounting techniques. Concrete fixtures may require mixing, pouring, and curing techniques. Regardless of the chosen technique, it is crucial to follow proper safety procedures and wear appropriate safety equipment.
Electrical Wiring and Safety Considerations
Electrical wiring is the most critical aspect of constructing homemade outdoor light fixtures. Incorrect wiring can lead to electrical shock, fire hazards, and damage to electrical components. Adhering to all applicable electrical codes and safety guidelines is paramount. If unfamiliar with electrical wiring, it is highly recommended to consult with a qualified electrician.
Before starting any electrical work, disconnect the power supply to the circuit at the breaker box. Use a voltage tester to verify that the circuit is de-energized before touching any wires. Always use weatherproof electrical boxes, connectors, and wiring rated for outdoor use. These components are designed to withstand exposure to moisture, temperature fluctuations, and ultraviolet radiation.
When wiring the light fixture, follow the manufacturer's instructions for the specific bulb and socket being used. Ensure that all connections are secure and properly insulated. Use wire strippers to remove the insulation from the wires without damaging the conductors. Twist the wires together tightly and secure them with wire connectors. Wrap electrical tape around the connectors to provide additional insulation and moisture protection.
Grounding is essential for electrical safety. Connect the grounding wire from the light fixture to the grounding wire in the electrical box. If the electrical box is metal, ensure that it is properly grounded to the grounding wire in the electrical circuit. Grounding provides a safe path for stray electrical current to flow in the event of a fault, preventing electrical shock.
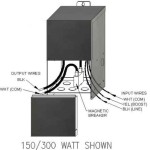
Use low-voltage lighting systems whenever possible. Low-voltage systems operate at a lower voltage than standard household circuits, reducing the risk of electrical shock. Low-voltage lighting is also more energy-efficient. These systems require a transformer to convert the standard household voltage to the lower voltage required by the lights.
Protect all outdoor electrical connections from moisture. Use weatherproof covers for electrical outlets and switches. Seal any openings in the fixture housing with silicone caulk to prevent water from entering. Bury underground wiring in conduit to protect it from damage. If the wiring is exposed, use weatherproof cable ties to secure it to the fixture.
Regularly inspect the light fixtures and wiring for any signs of damage. Look for cracked or broken casings, frayed wires, and loose connections. Repair or replace any damaged components immediately. If any electrical problems are detected, disconnect the power supply and consult with a qualified electrician.
```
7 Diy Outdoor Lighting Ideas To Illuminate Your Summer Nights Photos Huffpost Life

10 Best Outdoor Lighting Ideas Landscape Design Secrets A Piece Of Rainbow

Diy Outdoor Lighting 8 Cool Lights Bob Vila

Diy Outdoor Lights Simple And Easy Ideas For Homes Craftionary

Tin Can Diy Outdoor Lighting Tutorial You Do This The Heathered Nest

Creative And Easy Diy Outdoor Lighting Ideas The Navage Patch

Diy Outdoor Lights Simple And Easy Ideas For Homes Craftionary

21 Creative Diy Lighting Ideas Outdoor Backyard Pendant Light

Creative And Easy Diy Outdoor Lighting Ideas The Navage Patch

Diy Outdoor Lights Simple And Easy Ideas For Homes Craftionary
Related Posts