Removing Outdoor Light Fixtures: A Step-by-Step Guide
Outdoor light fixtures, while providing much-needed illumination, may eventually require removal for various reasons. Perhaps the fixture is outdated, damaged, or you simply desire a new aesthetic for your outdoor space. Whatever the reason, removing an outdoor light fixture safely and effectively is crucial. This guide offers a comprehensive overview of the process, addressing safety considerations, necessary tools, and step-by-step instructions for various types of fixtures.
Safety First: Essential Precautions
Before embarking on any electrical work, safety should be paramount. Ensure the power to the light fixture is disconnected at the breaker box. This is essential to prevent electric shock and ensure a safe working environment. Additionally, wear appropriate safety gear, such as gloves and eye protection, to prevent injuries from sharp edges or loose wires.
Tools and Materials Required
The tools required for removing an outdoor light fixture will vary depending on the fixture's design and installation method. However, the following tools are generally essential:
- Voltage detector
- Wire strippers
- Screwdriver (Phillips and flathead)
- Pliers
- Wrench (adjustable or socket)
- Ladder (if necessary)
- Electrical tape
- Wire connectors (optional)
- Optional: New light fixture (if replacing)
Step-by-Step Removal Process
The process for removing an outdoor light fixture can be broken down into several steps, regardless of the fixture type.
- Turn off the power. Locate the circuit breaker controlling the fixture and switch it to the "off" position. To ensure the circuit is truly deactivated, use a voltage detector to confirm the absence of electricity at the fixture's wiring.
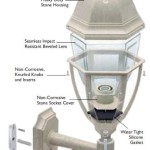
- Remove the fixture cover. Most outdoor light fixtures have screws securing the cover plate. Use a screwdriver to remove these screws and carefully detach the cover. Be mindful of any fragile elements within the fixture, such as glass panels or decorative accents.
- Disconnect the wires. Depending on the fixture, the wires may be connected using wire nuts or terminal blocks. Carefully remove the wire connections, noting the wire color and position. It's essential to identify the hot wire (usually black or red), the neutral wire (usually white), and the ground wire (usually green or bare copper).
- Remove the mounting plate. The mounting plate secures the fixture to the electrical box. This plate may be fastened with screws or a mounting bracket. Use appropriate tools to loosen and remove the plate.
- Remove the fixture. Once the mounting plate is detached, carefully remove the entire light fixture from its position. Be mindful of weight distribution, as some fixtures can be heavy.
- Remove the electrical box (optional). If you're not replacing the fixture with an identical one, you may need to remove the electrical box from the wall. This will involve disconnecting the wires at the box and removing any mounting screws.
Additional Considerations for Specific Fixture Types
While the general steps listed above apply to most outdoor light fixtures, some variations may exist depending on the specific type. Here are some key points to consider for different fixture designs:
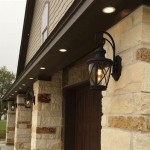
1. Wall-Mounted Fixtures
Wall-mounted outdoor lights are commonly used for illuminating walkways, patios, and entryways. Removing these fixtures usually involves the steps outlined above, but pay attention to the location of the mounting screws and the type of mounting plate. Some fixtures may have a decorative cover plate, which will need to be removed before accessing the mounting screws.
2. Post-Mounted Fixtures
Post-mounted fixtures are designed to be installed atop a supporting post or column. These fixtures often use a strong mounting bracket with bolts or screws to secure them. Removal will likely require loosening these fasteners and carefully detaching the fixture from the post. Ensure the post is stable during this process, as you don't want to cause instability or damage to the surrounding area.
3. Ceiling-Mounted Fixtures
Ceiling-mounted outdoor lights are typically used for illuminating porches, decks, and pergolas. These may be installed directly to the roof or to a supporting beam. Similar steps apply to removing these fixtures, but be cautious of the fixture's weight and height, which may require specialized tools or assistance.
Maintenance and Replacement
Once the old fixture is removed, ensure the electrical box and wires are in good condition. Repair or replace any damaged elements before installing a new fixture. If replacing the fixture, carefully install the new one following the manufacturer's instructions. Don't forget to test the new fixture after installation by turning the power back on at the circuit breaker.
Regular maintenance of your outdoor light fixtures is essential for their longevity. Inspect the fixtures regularly for signs of damage, corrosion, or loose connections. Clean the lenses and fixtures periodically to maximize light output and prevent debris buildup.

Preparing To Paint Removing The Porch Lights

Replacing An Outdoor Light Fixture

Home Improvement How To Remove Replace Outdoor Light Fixtures Porch Driveway Etc Outside

Replacing An Outdoor Light Fixture

How To Replace An Outdoor Light

How To Change An Outdoor Light Fixture On Diffe Types Of Siding The Home Depot

How To Replace An Outdoor Light Fixture

New Back Patio Light

5 Outdoor Lighting Styles And Ideas Design Inspirations Lights Com Blog

How To Remove An Outdoor Light Fixture From A Wall Ehow