Portfolio Outdoor Lighting Instruction Manual
This instruction manual provides comprehensive guidance on installing and maintaining Portfolio Outdoor Lighting fixtures. The manual covers a wide range of topics, from understanding the components of the lighting system to troubleshooting common issues. It is designed to assist both professional electricians and homeowners with their outdoor lighting projects. The information presented in this manual is intended to be used in conjunction with the specific product instructions provided with your chosen lights, and it is essential to follow all applicable safety guidelines and local electrical codes.
Understanding the Components
Portfolio Outdoor Lighting systems typically consist of various components working together to create the desired illumination. These components are designed for durability and long-lasting performance, ensuring years of enjoyment from your outdoor lighting.
The key components of an outdoor lighting system from Portfolio include:
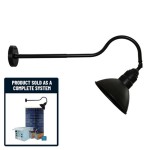
- Fixtures: These are the visible elements that house the light source, and they come in diverse styles, from traditional lanterns to contemporary spotlights.
- Light Sources: These are the bulbs that produce the light, and they can be LED, incandescent, or halogen.
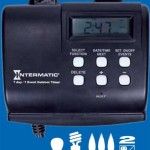
- Transformers: These devices convert the standard household voltage (typically 120 volts) to a lower voltage suitable for outdoor lighting, often 12 volts.
- Wiring: The electrical wiring connects the transformers, fixtures, and power source, ensuring a safe and efficient flow of electricity.
- Control Systems: Some systems include control systems, such as timers or photocells, that automatically adjust the lighting based on time or ambient light levels.
Installation Process
The installation process for Portfolio Outdoor Lighting requires careful planning and execution, and it is essential to prioritize safety throughout the process. Before beginning any installation, always ensure power is disconnected from the circuit.
Step 1: Planning and Preparation
The first step is to create a detailed plan, considering factors such as the desired lighting effects, fixture placement, and wiring requirements. It is essential to carefully measure the distances involved and determine the number and type of fixtures needed.
Step 2: Running the Wiring
Once the plan is finalized, the next step involves running the wiring. This may require digging trenches for underground wiring, or using existing conduit for above-ground installation. Ensure to use the appropriate type of wire for the voltage involved, and follow all safety guidelines and local electrical codes during this process.
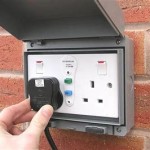
Step 3: Installing the Transformer
The transformer is typically installed in a dry, sheltered location near the power source. Secure the transformer to a wall or post with appropriate mounting hardware, ensuring it is accessible for maintenance.
Step 4: Installing the Fixtures
With the wiring and transformer in place, you can proceed to install the fixtures. Mount the fixtures securely to their designated locations, ensuring they are positioned according to the plan.
Step 5: Connecting the Wiring
This crucial stage involves meticulously connecting the wiring to the fixtures, transformer, and power source. Use the correct wire connectors and follow the manufacturer's instructions for each component. Before applying power, double-check all connections for accuracy and safety.
Step 6: Testing and Troubleshooting
Once the installation is complete, carefully test the system. Turn on the power and check to ensure all fixtures are illuminated and working correctly. If any issues arise, troubleshoot the problem by systematically examining the wiring, connections, and components to identify the source of the issue.
Maintenance and Troubleshooting
Proper maintenance is crucial to maximizing the lifespan and performance of your Portfolio Outdoor Lighting System. Regular cleaning, inspection, and repair ensure that your lights remain functional and aesthetically pleasing.
Regular Maintenance
To maintain your lighting system, perform the following tasks regularly:
- Clean the Fixtures: Remove dust, dirt, and debris from the fixtures, ensuring optimal light distribution and aesthetic appeal.
- Inspect the Wiring: Regularly check the wiring for damage, loose connections, or signs of wear and tear.
- Replace Bulbs: Over time, light bulbs will need replacement. Replace burned-out bulbs with the same type and wattage recommended for the fixture.
Troubleshooting Common Issues
If your outdoor lighting system malfunctions, it is important to diagnose the problem efficiently and apply the appropriate solution. Common issues that may arise include:
- Fixture Not Lighting Up: Check the bulb, wiring connections, and the power source to identify the cause.
- Flickering Lights: This could indicate loose wiring, a faulty bulb, or a problem with the transformer.
- Dimming Lights: This might be due to a failing bulb, a voltage drop in the wiring, or a faulty transformer.
It is highly recommended to consult a qualified electrician if you are unable to resolve the issue or if you are dealing with complex electrical problems.

Portfolio 12 Volt Multi Tap Landscape Lighting Transformer Instructions Modern Las Vegas

Portfolio 12 Volt Multi Tap Landscape Lighting Transformer Instructions Modern Las Vegas

Portfolio 12 Volt Multi Tap Landscape Lighting Transformer Instructions Modern Las Vegas

Instruction Manual For Malibu 300 Watt Transformer Falling Water

Hampton Bay Low Voltage 200 Watt Landscape Transformer Single Ng Sl 12a The Home Depot

Portfolio 8201080399 2 120 Volt Multi Tap Landscape Lighting Transformer Installation Guide Manualzz

Troubleshooting Portfolio 00689 Manual Page 4 Manualslib

Safety Instructions Portfolio 0475578 User Manual Page 2 Manualslib

Harbor Breeze 300 Watt 12 Volt Multi Tap Landscape Lighting Transformer With Digital Timer In The Transformers Department At Com

Portfolio Outdoor Garden Low Voltage Transformer Power Pack Stand Black Finish
Related Posts