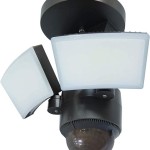
Philips MyGarden Creek Outdoor Wall Light Installation Instructions
The Philips MyGarden Creek Outdoor Wall Light is a stylish and functional addition to any outdoor space. Its sleek design and warm white light create a welcoming ambiance while providing ample illumination for pathways, entryways, and other areas. Installing this light fixture is a straightforward process that can be accomplished with basic tools and a little patience. This guide will walk you through the steps, ensuring a successful installation and years of enjoyment from your new outdoor lighting.
Preparing for Installation
Before you begin, it's crucial to gather the necessary tools and materials and prepare the installation area. This includes:
- Philips MyGarden Creek Outdoor Wall Light fixture
- Phillips head screwdriver
- Wire strippers
- Electrical tape
- Voltage tester
- Level
- Drill with appropriate drill bit for the wall surface
- Suitable anchors (if necessary)
- Safety glasses and gloves
Once you have all the necessary tools and materials, you can begin preparing the installation area. This involves:
- Turning off the power: Locate the circuit breaker controlling the outdoor lighting and turn it off. Always double-check that the power is off using a voltage tester.
- Preparing the wall: Clean the chosen wall area thoroughly, removing any dirt, debris, or loose paint. Ensure the surface is smooth for secure mounting.
- Marking the position: Using a level, mark the desired position of the light fixture on the wall. If necessary, use a pencil to trace the outline of the mounting plate.
Installing the Light Fixture
With the installation area prepared, you can proceed with the actual installation of the light fixture.
- Drilling pilot holes: Use the drill to make pilot holes at the marked positions for the mounting screws. The depth of these holes should be slightly less than the length of the mounting screws.
- Installing the mounting plate: Align the mounting plate with the marked position and secure it to the wall using the appropriate screws and anchors (if necessary). Ensure the mounting plate is level and flush with the wall surface.
- Connecting the wires: Carefully remove the wire caps from the light fixture and the electrical junction box. Match the corresponding wires (usually black to black, white to white, and green or bare copper to green or bare copper) and twist them together securely using wire connectors. Ensure there are no exposed wires and securely tape them to prevent any accidental contact.
- Securing the light fixture: Once the wires are connected, carefully attach the light fixture to the mounting plate and secure it with the appropriate screws. Ensure that the fixture is snug against the wall and free from any movement.
- Restoring power: After completing the installation, carefully re-install the wire caps to cover the connections. Then, cautiously turn the power back on at the circuit breaker and test the light fixture. Make sure it illuminates properly and that all connections are secure.
Troubleshooting and Maintenance
While installing the Philips MyGarden Creek Outdoor Wall Light is generally straightforward, some issues may arise. These might be related to faulty wiring, loose connections, or a damaged fixture.
If the light fixture doesn't work after installation, follow these steps:
- Check the power supply: Ensure the circuit breaker is switched on, and that there's no blown fuse in the junction box.
- Inspect the wiring: Carefully check all wire connections for any loose or broken wires. Re-tighten any loose connections or replace any damaged wires.
- Test the light fixture: After checking the wiring, turn the power back on and test the light fixture again. If it still doesn't work, contact a qualified electrician for assistance.
Maintenance of the Philips MyGarden Creek Outdoor Wall Light is relatively easy and should be done periodically to ensure its longevity and optimal performance.
- Clean the fixture: To keep the light fixture looking its best, gently clean it with a damp cloth and mild soap. Avoid using harsh chemicals or abrasive cleaners that could damage the finish.
- Inspect the bulb: Check the bulb for any signs of damage or wear. If necessary, replace it with a compatible LED bulb of the same wattage and type.
- Check the wiring: Regularly inspect the wiring for any signs of damage or wear. If any issues are found, contact a qualified electrician for repairs.
By following these instructions and implementing regular maintenance, you can ensure the Philips MyGarden Creek Outdoor Wall Light continues to illuminate your outdoor space with style and functionality for years to come.

User Manual Philips Mygarden 153883016 English 30 Pages

User Manual Philips Mygarden 153883016 English 30 Pages

Philips Mygarden Creek Outdoor Wall Light Review And Install

User Manual Philips Mygarden Creek English 8 Pages

Philips Mygarden Creek Outdoor Wall Light Review And Install

Philips Mygarden Creek Outdoor Wall Light Review And Install

Mygarden Wall Light 153883116 Philips

Mygarden Wall Light 153813116 Philips

User Manual Philips Mygarden 153873016 English 30 Pages

Mygarden Wall Light 153813116 Philips