Philips Ecomoods Bridge Outdoor Wall Light Installation Instructions
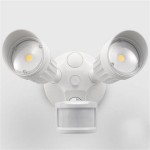
The Philips Ecomoods Bridge Outdoor Wall Light is a stylish and functional addition to any outdoor space. This comprehensive guide will provide step-by-step instructions for installing your new Ecomoods Bridge Outdoor Wall Light, ensuring a seamless and straightforward process.
Safety Precautions
Before starting the installation process, prioritize safety. *
Disconnect the power:
Always switch off the power supply to the circuit where you are installing the light fixture at the breaker box. This is crucial for preventing electric shock. *Use appropriate tools:
Employ the necessary tools for the installation, ensuring they are in good working condition. *Wear protective gear:
Wear safety glasses and gloves to protect yourself from potential hazards.Installation Steps
This guide will walk you through the installation process of your Philips Ecomoods Bridge Outdoor Wall Light:
1. Gather Necessary Materials
Before you begin, ensure you have all the required materials: * Philips Ecomoods Bridge Outdoor Wall Light fixture * Mounting hardware (screws, anchors, etc.) * Wire nuts (appropriate for the wire gauge being used) * Electrical tape * Level * Pencil * Screwdriver * Wire strippers * Voltage tester (optional)
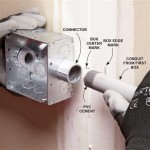
2. Locate the Electrical Box
Determine the location for your Ecomoods Bridge Outdoor Wall Light fixture. The ideal spot should be on a solid surface like an exterior wall and near an existing electrical box. The placement should be convenient for accessing the light fixture and wiring.
3. Mark the Mounting Location
Use a level to mark the desired location on the wall where the base of the fixture will be mounted. Use a pencil to draw a horizontal line to ensure consistent placement.
4. Drill Pilot Holes
Drill pilot holes at the marked locations for the mounting screws. Use a drill bit that is slightly smaller than the screw size. This step helps prevent splitting the wall material during installation.
5. Secure the Mounting Plate
Attach the mounting plate to the wall, aligning it with your marked line. Use the included screws or appropriate anchors if necessary. Ensure the mounting plate is firmly secured to the wall with no movement or wobble.
6. Connect the Wires
Now, it's time to connect the fixture's wires to the electrical box. *
Turn off the power:
Confirm that the power to the circuit is off at the breaker box. *Expose the wiring:
Carefully remove the electrical box cover and locate the incoming power wires (typically black, white, and bare). Locate the wires in the fixture's wiring compartment. *Connect the wires:
Connect the fixture's black wire to the black wire from the electrical box. Connect the white fixture wire to the white wire from the electrical box. Connect the green or bare ground wire from the fixture to the green or bare ground wire from the electrical box. Secure each connection with a wire nut. *Tape the connections:
Wrap electrical tape around each wire nut connection for added insulation and safety.7. Attach the Fixture
Carefully align the Ecomoods Bridge fixture with the mounting plate and secure it using the provided screws. Ensure the fixture is firmly attached and sits level on the wall.
8. Install the Cover
Replace the electrical box cover to conceal the wiring.
9. Test the Installation
Before restoring power, double-check all wire connections and ensure there are no loose wires. Once confident, turn the power back on at the circuit breaker. Test the Ecomoods Bridge Outdoor Wall Light to confirm that the new fixture is working properly.
Troubleshooting
If your newly installed Ecomoods Bridge Outdoor Wall Light is not functioning, follow these troubleshooting steps:
1. Check Power Source
Ensure that the power supply is switched on at the circuit breaker. If the power is off, then the fixture will not illuminate.
2. Verify Connections
Examine the wire connections inside the electrical box and at the fixture. Loose or incorrect connections can cause issues. Tighten any loose wire connections and make sure the wires are correctly connected to the appropriate terminals.
3. Test the Circuit
If necessary, use a voltage tester to check if there is power reaching the electrical box. A voltage tester can help determine if the issue lies with the circuit itself.
4. Replace the Bulb
If all other troubleshooting steps have been exhausted, examine the bulb. A faulty bulb can be the reason the light fixture is not working. Replace the bulb with a new one of the same wattage and type as recommended in the fixture's instructions.
By following these instructions, you can successfully install your Philips Ecomoods Bridge Outdoor Wall Light. Remember to prioritize safety and follow all electrical codes and regulations during the process.

Philips 163529316 Outdoor Light User Manual Manualslib

User Manual Philips Ecomoods 163519316 English 8 Pages

Philips Border Outdoor Lamp

Philips Ecomoods 163529316 User Manual English 30 Pages

Philips Hue Turaco Wall Lamp White Black Coolblue Before 23 59 Delivered Tomorrow

Philips Mygarden Arbor Outdoor Wall Led 6w 4000k 600lm Ip44 25000h

Pl Sh W122 B 7w

George Kovacs Angle Outdoor Wall Sconce 2modern

Cct Changeable Matte Exterior Porch Lights Ip65 Waterproof Sytmhoe

Warm White Synthetic And Aluminum Philips Eco Moods 15 W Wall Light For Home
Related Posts