```html
Outdoor Light Fixture Globe Replacement: A Comprehensive Guide
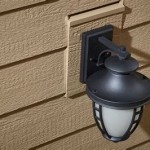
Outdoor light fixtures play a crucial role in enhancing curb appeal, providing safety and security, and creating an inviting atmosphere for outdoor spaces. A common maintenance task associated with these fixtures is replacing the globe, the translucent or transparent enclosure that diffuses and protects the bulb. Over time, globes can become cracked, faded, chipped, or simply outdated, necessitating replacement. This article provides a comprehensive guide to understanding the process of outdoor light fixture globe replacement, covering key considerations, necessary tools, and step-by-step instructions.
Understanding Globe Types and Compatibility
The first step in the replacement process is identifying the type of globe required. Globes come in various shapes, sizes, materials, and mounting styles. Identifying the correct replacement ensures proper fit, performance, and aesthetic consistency. Several factors contribute to determining the correct globe:
Shape and Size: Globes are available in a wide array of shapes, including round, square, cylindrical, acorn, and teardrop. Measure the dimensions (diameter, height, or length) of the existing globe to ensure the replacement is the correct size. A globe that is too large may not fit within the fixture housing, while one that is too small may not adequately protect the bulb or diffuse the light.
Material: Common globe materials include glass, acrylic, and polycarbonate. Glass offers excellent clarity and a classic aesthetic, but it is susceptible to breakage. Acrylic is a durable and lightweight alternative to glass, offering good light transmission and resistance to impact. Polycarbonate is the most impact-resistant material, making it ideal for areas prone to vandalism or accidental damage. Consider the environmental conditions and the level of durability required when selecting the material.
Mounting Style: Globes are typically attached to the fixture using one of several mounting styles. These include:
* Threaded: The globe has a threaded neck that screws into a corresponding threaded socket on the fixture.
* Friction Fit: The globe is held in place by friction, typically with a rubber gasket or a retaining ring.
* Set Screw: The globe is secured by one or more set screws that tighten against the globe's surface.
* Bayonet Mount: The globe has a bayonet fitting that locks into the fixture with a twisting motion.
Inspect the existing globe and fixture to determine the mounting style. Ensure the replacement globe is compatible with the existing mounting mechanism.
Light Transmission and Color: Globes are available in clear, frosted, and colored finishes. Clear globes provide the brightest light output, while frosted globes diffuse the light for a softer, more even illumination. Colored globes can add a decorative touch and alter the ambiance of the outdoor space. Consider the desired light output and aesthetic effect when selecting the globe's finish.
Manufacturer and Model: Whenever possible, identify the manufacturer and model number of the existing fixture. This information can often be found on a label or sticker attached to the fixture housing. Knowing the manufacturer and model can simplify the process of finding a direct replacement globe.
Essential Tools and Safety Precautions
Before commencing the globe replacement process, gather the necessary tools and prioritize safety. Working with electrical fixtures requires caution to prevent electrical shock or injury.
Essential Tools:
* Screwdriver: A variety of screwdrivers (Phillips head and flathead) may be needed, depending on the fixture's design.
* Pliers: Pliers can be useful for grasping small parts or loosening tight screws.
* Gloves: Wear work gloves to protect hands from sharp edges or debris.
* Safety Glasses: Protect eyes from dust, debris, or broken glass.
* Ladder or Step Stool: If the fixture is mounted high, a ladder or step stool will be required.
* Voltage Tester: A non-contact voltage tester can be used to confirm that the power to the fixture is off.
* New Globe: The correct replacement globe, matching the specifications of the original.
* Clean Cloth or Sponge: For cleaning the fixture housing after removing the old globe.
* WD-40 or Penetrating Oil: Helpful for loosening corroded or stuck screws.
Safety Precautions:
* Turn Off the Power: The most critical safety precaution is to disconnect the power to the light fixture at the circuit breaker or fuse box. Verify the power is off using a voltage tester before touching any wires or components.
* Work in Dry Conditions: Avoid working on electrical fixtures in wet or damp conditions.
* Use Insulated Tools: Use tools with insulated handles to minimize the risk of electrical shock.
* Exercise Caution When Using a Ladder: Ensure the ladder is placed on a stable and level surface. Have someone spot you if possible.
* Handle Broken Glass Carefully: If the old globe is broken, wear gloves and safety glasses to protect against cuts. Dispose of broken glass properly.
Step-by-Step Globe Replacement Instructions
With the appropriate tools and safety precautions in place, the globe replacement process can be completed systematically. The specific steps may vary slightly depending on the fixture's design, but the general principles remain the same.
Step 1: Disconnect the Power: As emphasized previously, the first step is to disconnect the power to the light fixture at the circuit breaker or fuse box. Double-check that the power is off using a voltage tester.
Step 2: Remove the Old Globe: The method for removing the old globe will depend on the mounting style. Here are the typical procedures for each type:
* Threaded Globes: Grasp the globe firmly and unscrew it counterclockwise. If the globe is stuck, try applying penetrating oil to the threads and allowing it to soak for a few minutes before attempting to unscrew it again.
* Friction Fit Globes: Gently but firmly pull the globe straight down or away from the fixture. If the globe is difficult to remove, try twisting it slightly while pulling. A rubber mallet can be used gently to tap around the rim of the globe to help loosen it.
* Set Screw Globes: Locate the set screws (typically small screws located around the base of the globe) and loosen them using a screwdriver. Once the set screws are loosened, the globe should slide out easily.
* Bayonet Mount Globes: Push the globe in slightly and twist it counterclockwise to release it from the bayonet fitting.
Step 3: Clean the Fixture Housing: Once the old globe is removed, clean the fixture housing with a clean cloth or sponge to remove any dirt, dust, or debris. This will ensure a clean surface for the new globe to seat against.
Step 4: Install the New Globe: Install the new globe using the reverse of the removal procedure. Ensure the globe is properly aligned and securely fastened. For threaded globes, avoid over-tightening, as this could damage the globe or the fixture.
Step 5: Replace the Light Bulb (Optional): While the globe is removed, it is a convenient opportunity to replace the light bulb if it is nearing the end of its lifespan. Choose a bulb with the appropriate wattage and color temperature for the fixture and the desired lighting effect.
Step 6: Restore Power and Test: Once the new globe is installed, restore power to the fixture at the circuit breaker or fuse box. Verify that the light is working properly. If the light does not turn on, double-check the bulb and wiring connections.
Step 7: Final Inspection: Inspect the installation to ensure the globe is securely fastened and that there are no gaps or leaks. Make any necessary adjustments.
By following these steps and adhering to safety precautions, homeowners can successfully replace outdoor light fixture globes, enhancing the appearance and functionality of their outdoor lighting systems.
```
Replacement Globes Mel Northey Co Inc

Ezra Outdoor 1 Light 7 Replacement Glass Globe Parts

Acrylic Glass Globes Replacement Lamp Repair Parts Shades Barn Lights Expert

White Acorn Street Light Globe For Outdoor Fixture W 4

Ezra Outdoor 2 Light 6 Replacement Glass Globe Parts

Uolfin Modern Black Outdoor Pendant Light Tora 1 Farmhouse Lantern Fixture With Seeded Glass Shade 628p76zi2ia244p The Home Depot

Replacing An Outdoor Light Fixture

Homemaxs Lightbulbs Outdoor Accessories Post Lights Lampshade Globe Replacement Acrylic Lamp Shade Light Fixture Lazada Ph

Newhouse Lighting 25 Pack Led Clear G40 Globe Light Bulbs For Outdoor String Lights Fits E12 And C7 Base 1 5 Inch Replacement Patio Com

Outdoor Light Globes Replacement Simple Lamp Shade Ball Lampshade Ceiling Fan
Related Posts