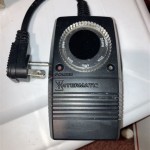
Outdoor Digital Light Timer Instructions
Outdoor digital light timers offer a convenient and energy-efficient way to control outdoor lighting. These devices automatically switch lights on and off at predetermined times, eliminating the need for manual intervention. This article will guide you through the installation and programming of a typical outdoor digital light timer, providing step-by-step instructions for optimal use.
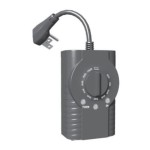
Understanding the Components
Before installation, it is crucial to familiarize yourself with the different components of an outdoor digital light timer. These components typically include:
- Timer Housing: The main casing of the timer, containing the electronic circuitry and display. It is designed for outdoor use and withstands weather elements.
- Power Cord: A weatherproof cord connecting the timer to a power source, usually an outdoor outlet. It often features a ground wire for safety.
- Output Terminals: Screw terminals for connecting the timer to the lighting fixture. They are typically color-coded for easy identification of live (hot), neutral, and ground wires.
- Display: A digital display that shows the current time, programmed settings, and other relevant information.
- Control Buttons: Buttons for setting the time, programming on/off times, and navigating through the menu.
Installation Process
The installation process of an outdoor digital light timer involves connecting it to the power source and the lighting fixture. Here is a step-by-step guide:
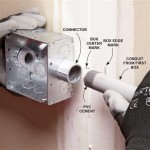
- Locate the power source: Identify the nearest outdoor outlet that will serve as the power source for the timer. This outlet should be within a safe distance from the timer housing.
- Connect the power cord: Plug one end of the power cord into the outdoor outlet and the other end into the timer housing. Ensure the connection is secure and the cord is not under tension.
- Mount the timer housing: Choose a location for the timer housing that is easily accessible and visible. Utilize the provided mounting screws and brackets to secure the timer to a wall or post. The housing should be level and secure.
- Disconnect power to the lighting fixture: Before connecting the timer to the lighting fixture, turn off power at the breaker box for safety. Ensure the power is off by testing the lights with a voltage tester.
- Connect the lighting fixture wires: With the power off, connect the wires from the lighting fixture to the output terminals of the timer housing. The live wire should be connected to the corresponding terminal, the neutral wire to its terminal, and the ground wire to the grounding terminal. Ensure connections are tight and secure.
- Turn power back on: Once all connections are made, turn the power back on at the breaker box and verify that the timer is working correctly. The display should show the current time and the timer should be ready for programming.
Programming the Timer
After installation, you can program the timer to switch the outdoor lighting on and off according to your desired schedule. The programming steps may vary slightly depending on the specific timer model, but the following general instructions apply:
- Set the current time: Press the appropriate buttons on the timer display to access the time setting mode. Use the up and down buttons to adjust the hour, minute, and AM/PM settings. Confirm the current time and exit the setting mode.
- Program on/off times: Access the programming mode, typically by pressing a dedicated button or navigating through the menu. Enter the desired on and off times for each day of the week. Some timers offer multiple on/off times per day for greater flexibility.
- Select the desired operation mode: Most outdoor digital light timers offer various operation modes, such as automatic, manual, or a combination of both. Choose the mode that best suits your needs.
- Save the program: After entering all settings, save the program by confirming the changes or pressing the appropriate button. The timer will now automatically switch the lights on and off according to the programmed schedule.
Outdoor digital light timers provide a convenient and energy-efficient solution for controlling outdoor lighting. By following the installation and programming instructions, you can easily set up and operate these devices. Remember to check the specific instructions for your chosen timer model for detailed information and any variations in the process.

Dewenwils Outdoor Digital Timer 7 Day Programmable Plug In With 3 Grounded S For Landscape String Light

Outdoor Digital Timer How To Set Up The Programs

Woods Outdoor Digital Timer Instructions Plants On Walls

Dewenwils Outdoor Digital Timer 7 Day Programmable Plug In With 3 Grounded S For Landscape String Light

Woods 15 Amp 24 Hour Outdoor Plug In Photocell Light Sensor Single Digital Timer Black 50013wd The Home Depot

Utilitech 3 Lighting Timer Tm 074 Review And Tutorial

How To Use A Timer Switch For Lights

Woods 15 Amp Outdoor Plug In Daily Block Heater Dual Digital Timer Black 50016wd The Home Depot

Digitally Programmable Outdoor Lights Timer Light Source

Digital Light Timer Select Twin Stanley Electrical Accessories
Related Posts