```html
Outdoor 12 Volt Lighting: A Comprehensive Guide
Outdoor lighting enhances property aesthetics, security, and functionality. Among the various options available, 12 volt lighting systems are a popular choice for many homeowners and businesses. Their relatively low voltage offers safety advantages and ease of installation compared to higher voltage alternatives. This article delves into the intricacies of 12 volt outdoor lighting, exploring its benefits, components, installation procedures, and maintenance considerations.
The term "12 volt refers to the electrical potential difference at which the lighting system operates. This lower voltage significantly reduces the risk of electrical shock compared to standard household voltage (120V or 240V, depending on the region). This inherent safety feature makes 12 volt systems suitable for outdoor applications where exposure to moisture and environmental elements is prevalent.
Safety and Benefits of 12 Volt Systems
The primary advantage of 12 volt outdoor lighting lies in its enhanced safety profile. The reduced voltage minimizes the danger of electrocution, making it a practical option for areas frequented by children and pets. Should a cable become damaged or exposed, the risk of serious injury is substantially lower than with a higher voltage system. This makes it ideal for DIY projects and homeowners concerned about electrical safety.
Another considerable benefit is the ease of installation. 12 volt systems typically do not require burying wires deeply underground or adhering to strict conduit regulations, as is often the case with line voltage systems. The wires can often be laid just beneath the surface, covered with mulch, or run along existing structures. This simplifies the installation process, saving time and labor costs.
Furthermore, 12 volt systems are energy efficient, especially when paired with LED (Light Emitting Diode) bulbs. LEDs consume significantly less power than traditional incandescent bulbs, resulting in lower electricity bills and reduced environmental impact. The long lifespan of LED bulbs also translates to fewer replacements and lower maintenance costs over the system's lifetime.
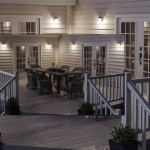
Flexibility in design is another key attribute. 12 volt systems offer a wide variety of fixtures, styles, and mounting options. This allows for customized lighting designs tailored to specific landscaping features, architectural elements, or security needs. From spotlights and path lights to floodlights and deck lights, the options are extensive.
Maintenance is also simplified. Replacing bulbs is a straightforward process, and troubleshooting issues is generally less complex than with high-voltage systems. The reduced risk of electric shock also makes maintenance safer for homeowners.
Key Components of a 12 Volt Lighting System
Understanding the core components of a 12 volt lighting system is crucial for proper installation and operation. These components work together to deliver safe and efficient illumination to your outdoor space.
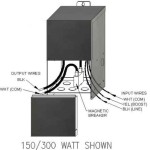
Transformer: The transformer is the heart of the system. It converts standard household voltage (120V or 240V) down to 12 volts. The transformer's wattage capacity determines the total wattage of lights that can be connected to the system. Selecting a transformer with sufficient wattage capacity is crucial to prevent overloading and ensure optimal performance. It is always recommended to choose a transformer with a wattage capacity that exceeds the total wattage of all connected lights by at least 20% to accommodate future additions or unforeseen voltage drops.
Low Voltage Cable: Low voltage cable carries the 12 volt power from the transformer to the individual light fixtures. The cable gauge (thickness) is important to consider, as it affects the amount of current the cable can safely carry. Thicker gauge cables are necessary for longer runs or higher wattage applications to minimize voltage drop. Voltage drop occurs when the electrical potential decreases along the length of the cable, resulting in dimmer lights at the end of the run. Consult a voltage drop chart to determine the appropriate cable gauge for your specific installation.
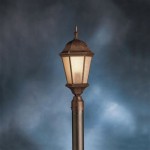
Light Fixtures: Light fixtures come in a wide variety of styles, materials, and functionalities. Consider the purpose of the lighting when selecting fixtures. Path lights illuminate walkways, spotlights highlight architectural features, floodlights provide broad area illumination, and deck lights enhance outdoor living spaces. The material of the fixture impacts its durability and resistance to corrosion. Common materials include aluminum, brass, copper, and plastic. Choose fixtures designed for outdoor use and rated for wet locations.
Connectors: Connectors are used to join the low voltage cable to the transformer and the individual light fixtures. These connectors must be weatherproof and corrosion-resistant to ensure a reliable electrical connection. Piercing connectors, which puncture the cable insulation to make contact with the wire, are commonly used for ease of installation. However, it is crucial to select high-quality connectors that provide a secure and watertight seal to prevent corrosion and ensure proper operation.
Timer/Photocell (Optional): A timer or photocell can be added to the system to automatically turn the lights on and off. A timer allows you to set specific on/off times, while a photocell automatically turns the lights on at dusk and off at dawn. These devices enhance convenience and energy efficiency.
Installation Considerations and Best Practices
Proper installation is critical for the safety, performance, and longevity of a 12 volt outdoor lighting system. Adhering to best practices will ensure a reliable and efficient system.
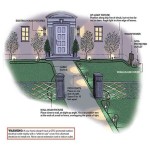
Planning the Layout: Before starting the installation, carefully plan the layout of the lighting system. Determine the desired locations for the lights and the transformer. Consider the placement of existing landscaping features, walkways, and structures. Sketch a detailed plan showing the location of each light fixture, the transformer, and the routing of the low voltage cable. This will help you estimate the amount of cable needed and identify any potential obstacles.
Transformer Placement: Choose a suitable location for the transformer. It should be mounted in a weatherproof enclosure and protected from direct sunlight and rain. The transformer should also be easily accessible for maintenance and adjustments. Consider mounting the transformer near an existing outdoor outlet or installing a dedicated outlet for the lighting system.
Cable Routing: When routing the low voltage cable, avoid areas where it could be easily damaged, such as high traffic areas or locations where digging is likely to occur. Bury the cable shallowly, typically a few inches below the surface, or conceal it under mulch or groundcover. Ensure that the cable is properly secured to prevent tripping hazards and protect it from being pulled or damaged.
Connector Installation: Use high-quality, weatherproof connectors to join the cable to the light fixtures and the transformer. Follow the manufacturer's instructions carefully to ensure a secure and watertight connection. Apply dielectric grease to the connectors to prevent corrosion and improve conductivity. Periodically inspect the connectors to ensure they are still tight and corrosion-free.
Testing and Adjustment: After connecting all the lights, test the system to ensure that all the fixtures are working properly. Check for any voltage drop by measuring the voltage at the last light in the run. If the voltage is significantly lower than 12 volts, you may need to use a thicker gauge cable or redistribute the lights across multiple transformer outputs. Adjust the aim of the lights to achieve the desired lighting effects. Consider using different types of lenses or filters to modify the light output and create different moods.
Safety Precautions: Always disconnect the power to the transformer before working on the lighting system. Wear appropriate safety gear, such as gloves and eye protection. Be cautious when working around buried utilities. Contact your local utility company to locate any underground lines before digging. Follow all applicable electrical codes and regulations.
Maintenance Schedule: Conduct regular maintenance to ensure the continued performance and longevity of the lighting system. Clean the light fixtures periodically to remove dirt, debris, and cobwebs. Replace any burned-out bulbs promptly. Inspect the cables and connectors for damage or corrosion. Check the transformer for proper operation. By following a regular maintenance schedule, you can prevent minor problems from escalating into major repairs.
12 volt outdoor lighting offers a safe, efficient, and versatile solution for illuminating residential and commercial landscapes. Its inherent safety features, ease of installation, and energy efficiency make it a popular choice for homeowners and businesses. By understanding the key components, installation procedures, and maintenance considerations, one can implement a well-designed and reliable outdoor lighting system that enhances the beauty, security, and functionality of any property.
```
12 Volt Vs 240 Outdoor Lights Part 3 Garden Landscape Lighting

12 Pack Of Dla01 Low Voltage Deck Lights Outdoor Step Kings Lighting

C Cattleya 12 Volt Dark Broe Low Voltage Waterproof Outdoor Landscape Spotlight With Mr16 Bulb 4 Pack Ca2302 4l The Home Depot

C Cattleya 12 Volt Dark Broe Low Voltage Waterproof Outdoor Landscape Spotlight With Mr16 Bulb 4 Pack Ca2302 4l The Home Depot

Benefits Of Using A 12 Volt Led Landscape Lighting Kit Oclights

Unique Lighting Systems Enterprise 12 Volt Brass Wall Light Landscapelightings Com

Techmar Lunia 12v Plug Play Led Garden Post Light Kits

Techmar Callisto 12v 1 5w Led Outdoor Wall Light

Simple And Easy 12 Volt Patio Lighting Wolf Creek Whole Irrigation Landscape Drainage Ponds Golf Turf Systems Training Project Support

Feit Electric 12 Volt Integrated Led Outdoor Spotlight Smart Wi Fi Connected Wireless Color And Tunable White No Hub Required 4 Pack Lvlandscapergbw Ag The Home Depot
Related Posts