Installing an Outdoor Lighting Transformer
Outdoor lighting transformers are essential components for low-voltage lighting systems. These devices reduce standard household voltage (120V) to the 12V or 24V required by landscape lighting fixtures. Proper installation ensures the safety and longevity of the lighting system. This guide outlines the steps involved in installing an outdoor lighting transformer.
Planning and Preparation
Before starting the installation, careful planning is crucial. Determining the total wattage of the lighting fixtures to be connected is the first step. This information is used to select a transformer with sufficient capacity. The transformer’s wattage rating should be at least 20% higher than the total wattage of the connected fixtures. This provides a safety margin and allows for potential future expansion of the lighting system.
Selecting a suitable location for the transformer is also important. The chosen location should be accessible for maintenance and protected from the elements. Ideally, the transformer should be mounted on a flat, dry surface, away from flammable materials. Checking local electrical codes for specific requirements and obtaining any necessary permits before beginning the installation is highly recommended.
Gathering Necessary Tools and Materials
Having all the necessary tools and materials readily available simplifies the installation process. Typically, this includes the transformer, wire connectors, a waterproof junction box (if required), electrical tape, wire strippers, a screwdriver, a drill with appropriate bits, mounting hardware (screws or bolts), and a GFCI-protected outdoor electrical outlet.
Mounting the Transformer
The transformer should be securely mounted according to the manufacturer’s instructions. This often involves using screws or bolts to attach the transformer to a wall, post, or other suitable structure. Using a waterproof junction box is recommended, especially in damp locations. The junction box provides additional protection for the wiring connections, ensuring the system's long-term safety and reliability.
Connecting the Power Supply
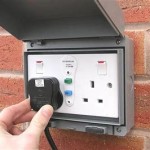
Connecting the transformer to a GFCI-protected outdoor electrical outlet is essential for safety. The GFCI (Ground Fault Circuit Interrupter) provides protection against electrical shocks. Before making any connections, ensure the power to the circuit is turned off at the main breaker panel. Using the appropriate wire gauge for the distance between the transformer and the fixtures helps to minimize voltage drop and ensure efficient operation of the lights.
Wiring the Low-Voltage Lighting Circuit
Connecting the low-voltage wires from the lighting fixtures to the transformer requires careful attention to polarity. Matching the wire colors (typically black for positive and white for negative) ensures proper operation of the lights. Securely fastening the wires to the transformer terminals using the provided connectors or screws prevents loose connections and potential problems.
Using waterproof wire connectors for all connections within the low-voltage circuit is crucial, especially when burying cables underground. This protects the connections from moisture and corrosion, ensuring the longevity of the system. If the wiring runs through conduits, ensuring the conduits are properly sealed at both ends prevents water from entering and causing damage.
Testing the System
After all connections are made, restore power to the circuit and test the lighting system. Verify that all lights are functioning correctly and that there are no shorts or other issues. If any problems are detected, immediately turn off the power and troubleshoot the connections. Using a multimeter to check the voltage at various points in the circuit helps identify any problems with wiring or connections.
Burying Cables (If Applicable)
If burying the low-voltage cables underground, use a direct burial cable rated for outdoor use. Dig a trench deep enough to protect the cable from damage (typically 6-12 inches). Carefully lay the cable in the trench, avoiding sharp bends or kinks. Cover the cable with soil and tamp it down gently to secure it in place. Marking the location of the buried cable helps prevent accidental damage during future landscaping or excavation work.
Regular Maintenance
Regular maintenance helps ensure the long-term performance and safety of the outdoor lighting system. Periodically inspect the transformer and wiring for signs of damage or wear. Check for loose connections, exposed wires, or signs of overheating. Clean the lighting fixtures to remove debris and ensure optimal light output.

How To Install A Low Voltage Transformer Flip The Switch

Install Landscape Lighting For Added Curb Appeal

The Easiest Way To Install Low Voltage Landscape Lighting Abby Organizes

How To Install Low Voltage Outdoor Landscape Lighting The Garden Glove

How To Wire Outdoor Low Voltage Lighting Part 3

Installing A Transformer For Low Voltage Landscape Lighting

Wiring Installation Coastal Source

How To Install Low Voltage Lighting 12 Steps With Pictures

How To Easily Install Landscape Lighting With No Tools

How To Install Outdoor Lighting Junction Box Aka Wire Mount A Landscape Transformer