Installing Outdoor Wall Lights: A Comprehensive Guide
Outdoor wall lights serve a dual purpose: enhancing the aesthetic appeal of a property and providing crucial security lighting. Proper installation is paramount for optimal performance, longevity, and adherence to safety standards. This article provides a detailed guide to installing outdoor wall lights, encompassing preparation, wiring, mounting, and testing procedures.
Planning and Preparation
Prior to commencing the installation process, a comprehensive plan is essential. This involves assessing the location, selecting appropriate fixtures, ensuring compatibility with the existing electrical system, and gathering necessary tools and materials.
Location Assessment: The first step is to determine the optimal locations for the outdoor wall lights. Consider factors such as the areas needing illumination, architectural features to highlight, and potential obstructions. Common locations include entryways, patios, garages, and pathways. Ensure the selected locations have access to an electrical junction box, or be prepared to install one.
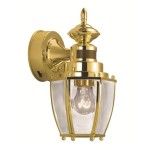
Fixture Selection: The choice of outdoor wall lights depends on several factors, including aesthetic preferences, lighting requirements, and environmental conditions. Consider the style of the property and select fixtures that complement the existing architecture. Ensure the fixtures are specifically designed for outdoor use and are rated for wet or damp locations, as indicated by a UL (Underwriters Laboratories) listing. Different types of fixtures include:
- Lanterns: Offer a traditional and decorative aesthetic.
- Floodlights: Provide broad illumination for security purposes.
- Spotlights: Highlight specific architectural features.
- Motion sensor lights: Enhance security by activating when movement is detected.
Electrical Compatibility: Verify that the existing electrical system can handle the additional load of the new lights. Consult a qualified electrician if unsure. Ensure the circuit breaker controlling the outdoor lighting circuit is appropriately sized. It is also crucial to confirm the voltage of the fixtures matches the voltage of the electrical supply (typically 120V in North America).
Tools and Materials: Assemble all necessary tools and materials before starting the installation. This includes:
- Outdoor wall light fixtures
- Electrical junction box (if needed)
- Wire connectors (wire nuts)
- Electrical tape
- Screwdrivers (various types)
- Pliers
- Wire stripper
- Voltage tester
- Drill with appropriate drill bits
- Level
- Ladder (if necessary)
- Safety glasses
- Gloves
- Weatherproof sealant
Safety Precautions: Prioritize safety throughout the installation process. Always turn off the power to the circuit before working on any electrical components. Use a voltage tester to confirm the power is off. Wear safety glasses and gloves to protect against electrical shock and physical injury. If uncomfortable working with electricity, hire a qualified electrician.
Wiring Procedures
Proper wiring is crucial for safe and reliable operation of the outdoor wall lights. This involves connecting the fixture wires to the wires in the junction box, ensuring correct polarity and secure connections.
Power Disconnection: Before commencing any wiring, turn off the power to the circuit at the main electrical panel. Locate the circuit breaker that controls the outdoor lighting circuit and switch it to the "OFF" position. Verify the power is off at the junction box using a voltage tester. Place a piece of tape on the circuit breaker indicating that work is in progress, preventing accidental reactivation.
Junction Box Preparation: Inspect the junction box for any damage or corrosion. If necessary, replace the junction box with a new one suitable for outdoor use. Ensure the junction box is securely mounted to the wall.
Wire Identification: Identify the wires in the junction box. Typically, there will be a black wire (hot), a white wire (neutral), and a green or bare copper wire (ground). The fixture wires will also have corresponding colors.
Wire Connections: Connect the fixture wires to the wires in the junction box using wire connectors (wire nuts). Follow these steps:
- Strip approximately ½ inch of insulation from the end of each wire.
- Twist the corresponding wires together (black to black, white to white, green to green/bare copper).
- Securely screw a wire connector onto the twisted wires, ensuring a tight connection.
- Wrap electrical tape around the wire connectors for added insulation and security.
Grounding: Proper grounding is essential for safety. Connect the green or bare copper wire from the fixture to the ground wire in the junction box. If the junction box is metal, ensure the ground wire is also connected to a grounding screw within the box.
Wire Management: Carefully tuck the wires back into the junction box, ensuring they are not pinched or strained. Avoid overcrowding the junction box with excessive wiring. Arrange the wires neatly to allow for easy access in the future.
Mounting the Fixture
Once the wiring is complete, the next step is to mount the fixture securely to the wall. This involves attaching the mounting bracket, connecting the fixture to the bracket, and sealing the fixture to prevent water intrusion.
Mounting Bracket Installation: Most outdoor wall lights come with a mounting bracket that attaches to the junction box. Position the mounting bracket over the junction box and align the screw holes. Secure the bracket to the junction box using the provided screws. Ensure the bracket is level before tightening the screws.
Fixture Attachment: Carefully lift the fixture and align it with the mounting bracket. Connect the fixture to the bracket using the provided screws or fasteners. Ensure the fixture is securely attached and does not wobble. Follow the manufacturer's instructions for specific attachment procedures.
Weatherproofing: To prevent water intrusion, apply a bead of weatherproof sealant around the perimeter of the fixture where it meets the wall. This will create a watertight seal and protect the electrical connections from moisture damage. Choose a sealant specifically designed for outdoor use and follow the manufacturer's instructions for application.
Bulb Installation: Install the appropriate light bulb into the fixture. Refer to the manufacturer's specifications for the correct bulb type and wattage. Ensure the bulb is securely screwed into the socket.
Fixture Alignment: Visually inspect the fixture to ensure it is properly aligned and level. Make any necessary adjustments to the mounting bracket or fixture position. A level fixture not only looks aesthetically pleasing but also ensures proper light distribution.
Testing and Final Adjustments
After mounting the fixture, the final step is to test the light and make any necessary adjustments to ensure proper operation.
Power Restoration: Return to the main electrical panel and switch the circuit breaker back to the "ON" position. Observe the outdoor wall light to ensure it turns on. If the light does not turn on, recheck the wiring connections and bulb installation.
Functionality Testing: Test the functionality of the light by switching it on and off several times. Ensure the light operates smoothly and does not flicker. If the light has a motion sensor or other features, test these functions to ensure they are working correctly.
Light Distribution Assessment: Observe the light distribution to ensure it meets the intended purpose. Adjust the angle or position of the fixture if necessary to optimize the illumination. Consider the impact of the light on neighboring properties and avoid causing unnecessary glare.
Final Inspection: Conduct a final inspection of the installation to ensure all connections are secure, the fixture is properly mounted, and the weatherproofing is intact. Remove any debris or tools from the work area.
Documentation: Keep a record of the installation, including the date, fixture type, and any specific instructions or adjustments made. This documentation will be helpful for future maintenance or troubleshooting.
By following these detailed instructions and prioritizing safety, the installation of outdoor wall lights can be accomplished effectively and efficiently, enhancing the beauty and security of the property.

How To Install Outdoor Wall Lighting Light Fixtures Mr Electric

How To Install Outdoor Wall Lights

Top Tips Replacing An Outdoor Wall Sconce Porch Daydreamer

4 Key Points You Must To Know Install Outdoor Wall Sconce On 2024 Gzbtech

How To Install A Sconce Outdoors Bob Vila

How To Install Outdoor Wall Lighting For Home Improvement

How To Install Outdoor Light Fixtures Replace Garage Lights

Outdoor Light Easy Installation Without Touching The House Electrics

Top Tips Replacing An Outdoor Wall Sconce Porch Daydreamer

How To Install Outdoor Wall Lighting For Home Improvement
Related Posts