How to Wire an Outdoor Light
Adding outdoor lighting can enhance the curb appeal of your home, improve safety, and create a welcoming atmosphere for guests. Installing an outdoor light fixture typically involves running electrical wire to the location where the light will be mounted and connecting it to a power source. This process requires some basic knowledge of electrical wiring and safety practices. This article will guide you through the steps involved in wiring an outdoor light fixture, ensuring a safe and successful installation.
Safety Precautions
Working with electricity can be dangerous if proper precautions are not taken. Always disconnect the power to the circuit you will be working on before beginning any wiring. This can be done by turning off the corresponding breaker in the electrical panel. Use insulated tools to handle wires and components, and wear protective gear, such as safety glasses and gloves. If you are uncomfortable or unsure about any aspect of the wiring process, it is always best to consult a qualified electrician.
Materials and Tools
Before starting the installation, gather the necessary materials and tools. These may include:
- Outdoor light fixture
- Electrical wire (14-gauge or 12-gauge, depending on the fixture's wattage)
- Wire connectors (wire nuts)
- Junction box (if required)
- Weatherproof conduit (if required)
- Grounding rod (if required)
- Voltage tester
- Wire strippers
- Screwdrivers (Phillips and flathead)
- Drill and drill bits
- Level
- Tape measure
- Safety glasses and gloves
Steps for Installing an Outdoor Light
Follow these steps to install an outdoor light fixture:
- Plan the Location: Determine the best location for your outdoor light. Consider factors like visibility, desired coverage area, and proximity to a power source. You may also want to factor in the aesthetics of your home's exterior.
- Turn Off the Power: Locate the circuit breaker that controls the outdoor outlet or junction box you will be using. Turn off the breaker and verify that the power is off using a voltage tester.
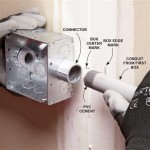
- Route the Wire: If necessary, run electrical wire from the power source to the desired location of the light fixture. Use conduit to protect the wire from the elements. Ensure that the wire is properly secured and routed according to local electrical codes.
- Install the Junction Box: If you are not using a pre-existing junction box, install a weatherproof junction box at the light fixture location. This will house the wire connections and protect them from the elements.
- Mount the Fixture: Follow the manufacturer's instructions to mount the light fixture securely to the desired location. Ensure that it is level and stable.
- Wire the Connections: Connect the wires from the fixture to the wires coming from the power source. Use wire connectors (wire nuts) to secure the connections. Ensure that the wires are connected correctly according to the color coding.
- Ground the Fixture: Connect the fixture's grounding wire to the green grounding wire in the electrical system. This provides a path for electricity to flow to the ground in case of a short circuit, preventing electrical shock.
- Test the Connection: Turn the power back on at the breaker box and test the fixture for proper operation. Make sure the light works and there are no sparks or overheating. If there are any issues, turn off the power and recheck the connections.
- Secure and Finalize: After confirming proper function, ensure all connections are secure and all wires are properly insulated. Secure any loose wires and use weatherproof sealant around the junction box and other openings to prevent moisture intrusion.
These steps provide a general overview of the installation process. Specific details may vary depending on the type of fixture, your local electrical codes, and your electrical setup. Always consult with a qualified electrician if you have any doubts or questions.
Additional Considerations
Here are some additional considerations for wiring an outdoor light fixture:
- Type of Fixture: Choose a fixture specifically designed for outdoor use. These fixtures have weatherproof enclosures and materials that can withstand rain, snow, and other weather conditions.
- Wattage and Circuit: Select a fixture that does not exceed the capacity of the circuit it is being connected to. You may need to upgrade the circuit if it is not strong enough to handle the fixture's wattage.
- Safety Switches: Consider incorporating safety switches, such as ground fault circuit interrupters (GFCIs), into the electrical system. These devices will automatically interrupt power in the event of a ground fault, reducing the risk of electrical shock.
- Local Codes: Familiarize yourself with local electrical codes and regulations before beginning any electrical work. These codes may require specific installation methods, materials, and inspections.
Following these guidelines and taking proper safety precautions can help you successfully wire an outdoor light fixture. Remember, if you are unsure about any aspect of the process or if your project involves complex electrical wiring, it is always advisable to consult a qualified electrician for professional assistance.

Outdoor Low Voltage Lighting Diy Family Handyman

How To Wire A Light Switch And Outside Together Ehow

How To Replace An Outdoor Light

How To Replace An Outdoor Light

How To Install Outdoor Lighting And Diy Home Electrical Wiring

How To Install Outdoor Light Fixture On Brick

Zenith Motion Sensor Wiring Diagram Outside Lights To Handyman Wire Home Electrical

Wire 4 Outdoor Lights With One Switch Diy Home Improvement Forum

The Best Way To Connect Power Cable For Outdoor Light

Replacing An Outdoor Light Fixture
Related Posts