How to Replace an Outdoor Sensor Light
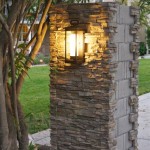
Outdoor sensor lights are a valuable security feature for any home, providing illumination when motion is detected. Over time, however, these lights can malfunction or become damaged, requiring replacement. Replacing an outdoor sensor light is a relatively straightforward process that most homeowners can handle themselves with the proper tools and instructions. This article will guide you through the steps of replacing an outdoor sensor light, ensuring a safe and successful installation.
Step 1: Safety First
Before beginning any electrical work, it is crucial to prioritize safety. Always disconnect the power to the light fixture at the circuit breaker. To confirm the power is off, use a non-contact voltage tester. Never work on live electrical wires. Additionally, wear safety glasses to protect your eyes from any debris or sparks.
Step 2: Removing the Old Light Fixture
With the power off, you can begin removing the old light fixture. Start by removing any decorative covers or trim around the light. Next, locate the mounting screws that hold the fixture to the wall or soffit. These screws are typically located on the sides or bottom of the fixture. Use a screwdriver to loosen and remove these screws. Once the screws are removed, gently detach the fixture from the wall. Be careful not to pull on the wires as you detach the fixture.
Once the fixture is removed, you will need to disconnect the wires. Each wire will be connected to a terminal on the fixture. Use a wire stripper to remove a small amount of insulation from the ends of the wires. This will expose the bare copper wire, making it easier to connect to the new fixture. Gently pull the wires apart at the terminal, disconnecting them from the old fixture.
Step 3: Installing the New Light Fixture
With the old fixture removed, you can now install the new one. Begin by aligning the new fixture with the mounting holes on the wall or soffit. If your new fixture includes a new mounting plate, install that first. Then, use the screws that came with the new fixture to secure it to the wall. Make sure the screws are tight enough to hold the fixture securely, but not so tight that they damage the fixture or wall. Next, connect the wires to the new fixture. Each wire will be color-coded:
-
Black wire:
Connects to the “hot” terminal on the fixture, which carries electrical current. -
White wire:
Connects to the “neutral” terminal, which provides a return path for the current. -
Green or bare copper wire:
Connects to the “ground” terminal, which protects against electrical shocks.
Use wire connectors, known as wire nuts, to connect the wires. Twist the wires together, then secure the wire nut over the twisted wires. Ensure all connections are secure and no strands of wire are exposed.
Step 4: Testing and Finishing Touches
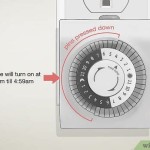
Once all the wires are connected, it's time to test the new light fixture. Turn the power back on at the circuit breaker. If the light turns on and the sensor is functioning correctly, you have successfully replaced your outdoor sensor light. Finally, replace any decorative covers or trim that you removed during the installation process.
Choosing the Right Replacement Fixture
Choosing the right replacement fixture can be easy. Most outdoor sensor lights are compatible with standard electrical connections. However, you should consider the following factors:
-
Lumens:
Lumens measure the brightness of a light source. Choose a fixture with a sufficient number of lumens to illuminate your desired area. -
Bulb Type:
Sensor lights may use various bulb types, including incandescent, halogen, LED, and CFL. Each type has its advantages and disadvantages, such as lifespan, energy efficiency, and color temperature. -
Sensor Range and Sensitivity:
Consider the area you need to illuminate and the desired range of the sensor. You can adjust the sensitivity of the sensor to detect motion at different distances. -
Style and Design:
Choose a fixture that complements the style of your home and enhances its curb appeal.

Installing A Remote Motion Detector For Lighting Diy

How To Install Replace Outdoor Light Easy Simple

How To Replace A Light Sensor On Fixture Hunker

How To Repair Motion Sensor Lights Hunker

How To Install Motion Lights

How To Install An Outdoor Motion Sensor Light With Pictures

How To Install An Outdoor Motion Sensor Light With Pictures

Motion Sensor Lights Tips To Reset Detector

How To Install An Outdoor Motion Sensor Light With Pictures

How To Adjust Your Sensor Light Metro Electrical 24 Hour Electricians