How to Replace an Outdoor Light Sensor
Outdoor light sensors, also known as photocells or dusk-to-dawn sensors, are essential components of many outdoor lighting systems. They automatically turn lights on at dusk and off at dawn, providing security and convenience. Over time, these sensors can malfunction or become damaged, requiring replacement. This article will guide you through the process of replacing an outdoor light sensor, providing clear instructions and safety tips.
Step 1: Gather Necessary Tools and Supplies
Before starting the replacement process, gather the following tools and supplies:** *
New light sensor:
Choose a sensor compatible with your existing fixture and desired features (e.g., adjustable timer, multiple mounting options). *Wire strippers:
To strip insulation from the wires. *Wire cutters:
To cut wires if necessary. *Voltage tester:
To confirm power is disconnected. *Screwdriver:
To remove screws securing the old and new sensors. *Electrical tape:
To insulate wire connections. *Optional:
Wire connectors (optional, but recommended for a more secure connection). *Safety glasses:
To protect your eyes. *Gloves:
For insulation and protection.Step 2: Disconnect Power to Fixture
Safety is paramount when working with electrical systems. Before proceeding, disconnect power to the outdoor light fixture. This is usually done at the circuit breaker panel. Locate the breaker controlling the fixture, switch it to the "off" position and confirm that the power is shut off by trying to turn on the light.
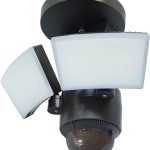
Step 3: Remove the Old Light Sensor
With the power disconnected, you can safely remove the old sensor. Carefully inspect the sensor's mounting and wiring. *
Mounting:
Note how the old sensor was secured. Some sensors are attached with screws, while others may have a snap-on design. *Wiring:
Carefully examine the wiring connections. Take note of the wire colors (usually black, white, and ground wire) and their positions within the sensor's terminals. This will help in connecting the new sensor correctly. *Removal:
Once you understand the mounting and wiring, use the appropriate tools (screwdriver or pliers) to remove the old sensor from the fixture. Be careful not to damage the wiring while detaching it.Step 4: Install the New Light Sensor
Now, it's time to install the new sensor. *
Mounting:
Mount the new sensor in the same location as the old one. If necessary, use the provided screws and anchors or a snap-on design. *Wiring:
Connect the wires from the new sensor to the existing fixture wires, matching the colors. *Black Wire (Hot):
Connect the black wire from the sensor to the black wire from the fixture. *White Wire (Neutral):
Connect the white wire from the sensor to the white wire from the fixture. *Ground Wire (Green or Bare):
Connect the green or bare ground wire from the sensor to the green or bare ground wire from the fixture. *Wires and Connections:
Twist the wires together, then use wire connectors or electrical tape to insulate and secure the connection to the fixture. *Testing:
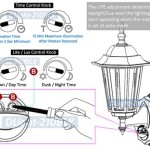
Once all connections are secure, reconnect the power to the fixture at the breaker panel and test the new sensor by turning on the light switch. The light should turn on at dusk and off at dawn based on the sensor's settings.Step 5: Adjust Sensor Settings (If Applicable)
Some light sensors come with adjustable settings, such as sensitivity and timer. Refer to the sensor's instructions to understand and adjust these settings according to your needs. For example, you may want to adjust the sensitivity to reduce the risk of false activations due to ambient light.
Step 6: Final Touches
After installing and testing the new sensor, make sure all connections are secure and the sensor is mounted properly. Replace any screws or covers removed during the installation process.
Replacing an outdoor light sensor is a simple process that can be completed by most homeowners with basic electrical knowledge. By following these steps and observing safety precautions, you can ensure your outdoor lighting system continues to function reliably and provide security and convenience.

Motion Light Sensor Replacement

How To Replace An Exterior Flood Light With Motion Sensor

How To Install An Outdoor Motion Sensor Light With Pictures

How To Replace An Exterior Flood Light With Motion Sensor

How To Replace Repair Of A Lamppost Sensor Simple 15 Diy

Motion Light Sensor Replacement

How To Install An Outdoor Motion Sensor Light With Pictures

Motion Sensor Lights Tips To Reset Detector

Installing A Remote Motion Detector For Lighting Diy

A Short Guide To Fixing And Replacing Faulty Motion Sensor Lights
Related Posts