How To Replace An Outdoor Sconce
Replacing an outdoor sconce involves a straightforward process that can enhance the aesthetic and security of a home's exterior. This guide provides step-by-step instructions for safely and effectively replacing an existing outdoor sconce.
Safety First: Disconnecting Power
Before initiating any electrical work, safety is paramount. Turn off the power to the sconce circuit at the main electrical panel. This crucial step prevents electrical shock. Verify the power is off by flipping the sconce switch a few times. If the sconce no longer illuminates, the circuit is successfully de-energized.
Using a non-contact voltage tester is recommended for double-checking the absence of voltage at the sconce wires. This provides an additional layer of safety and helps ensure the circuit is completely dead before proceeding.
Removing the Old Sconce
Once the power is confirmed off, the next step is to remove the old sconce. Begin by removing any decorative elements covering the mounting screws. These elements often involve small screws or clips. Carefully unscrew these to access the mounting hardware.
Next, unscrew the mounting screws that secure the sconce base to the wall. Keep the screws safely aside for potential reuse with the new sconce. Gently pull the sconce away from the wall, exposing the wiring connections.
Carefully disconnect the wires from the old sconce. Note the wiring configuration, typically involving black (hot), white (neutral), and green or bare copper (ground) wires. If the wires are connected using wire nuts, unscrew them. If the wires are push-in connectors, use a small screwdriver to release the wires. Take a photograph of the wiring connections for reference when installing the new sconce.
Installing the New Sconce
With the old sconce removed, the next step is to install the new fixture. Begin by carefully connecting the wires of the new sconce to the wires coming from the wall. Match the wire colors: black to black, white to white, and green/bare copper to green/bare copper. Use wire nuts to secure the connections, ensuring they are firmly tightened.
If the new sconce utilizes push-in connectors, ensure the wires are fully inserted and secure. Gently tug on each wire to confirm a solid connection.
Once the wires are connected, carefully tuck them into the electrical box behind the sconce. Align the new sconce's mounting bracket with the electrical box and secure it using the appropriate screws. If the screws from the old sconce are compatible, they can be reused. Otherwise, utilize the screws provided with the new sconce.
After securely mounting the sconce, attach any decorative elements according to the manufacturer's instructions. Ensure these elements are properly secured to complete the installation.
Restoring Power and Testing
With the new sconce installed and all components securely fastened, the final step is to restore power. Return to the main electrical panel and turn the sconce circuit breaker back on. Flip the sconce switch to test the new fixture. The sconce should illuminate, confirming a successful installation.
If the sconce does not illuminate, double-check the wiring connections to ensure they are tight and properly matched. If the problem persists, it is advisable to consult a qualified electrician for further assistance.
Considerations for Different Sconce Types
While the general process for replacing an outdoor sconce remains consistent, certain variations may exist depending on the specific type of sconce. For example, some sconces may have different mounting mechanisms or specialized wiring requirements. Always refer to the manufacturer's instructions provided with the new sconce for specific guidance.
For low-voltage sconces, the process usually involves connecting the low-voltage wires to a transformer. Ensure the transformer is correctly wired and compatible with the new sconce. Solar-powered sconces, on the other hand, do not require electrical wiring but may involve specific mounting procedures or charging requirements. Always consult the manufacturer's instructions for these specialized installations.
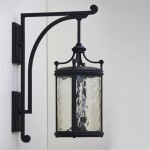
Selecting the Right Replacement Sconce
Choosing the right replacement sconce involves considering factors such as the sconce's location, desired lighting effect, and overall aesthetic. For entryways and walkways, brighter sconces enhance visibility and security. For patio or garden areas, softer lighting options create a more ambient atmosphere.
Consider the sconce's material and finish to ensure it complements the home's exterior style. Select a sconce with a weather-resistant rating suitable for outdoor conditions to ensure longevity and optimal performance.

Top Tips Replacing An Outdoor Wall Sconce Porch Daydreamer

Replacing An Outdoor Light Fixture Concord Carpenter

How To Replace An Outside Light

Replacing An Outdoor Light Fixture Concord Carpenter

How To Replace An Outdoor Light Fixture

How To Replace An Outdoor Light Fixture Facets Of Lafayette

How To Replace An Outside Light

Top Tips Replacing An Outdoor Wall Sconce Porch Daydreamer

Replacing An Outdoor Light Fixture Concord Carpenter

How To Install A Sconce Outdoors Bob Vila