How To Program A Stanley Outdoor Timer
Stanley outdoor timers offer a convenient way to automate outdoor lighting, seasonal decorations, or other electrical devices. These timers are designed to withstand outdoor conditions and provide users with a simple and reliable way to control their devices. Proper programming is essential to ensure the timer operates according to the user’s desired schedule. This article provides a comprehensive guide to programming various types of Stanley outdoor timers, covering common features and troubleshooting tips.
Understanding the Different Types of Stanley Outdoor Timers
Stanley offers a range of outdoor timers, each with its own programming method. It is crucial to identify the specific model of the timer before attempting to program it. Common types include mechanical timers, digital timers, and smart timers. Mechanical timers utilize a rotating dial with pins to set the on/off times. Digital timers feature a digital display and buttons for programming specific times and days. Smart timers connect to a home Wi-Fi network and can be controlled via a smartphone app or voice assistant.
The programming instructions will vary based on the type of timer. Attempting to use instructions for a digital timer on a mechanical timer, for example, will prove unsuccessful. Always refer to the user manual that accompanied the timer for the most accurate and model-specific instructions. If the manual is lost, often it can be found on the Stanley website by searching for the model number.
Knowing the type of timer is the initial step toward successful programming. Once the timer type is identified, the user can proceed to the appropriate section of this guide for specific instructions, remembering that these instructions are general and the user manual should be consulted for the absolute best information.
Programming a Stanley Mechanical Outdoor Timer
Mechanical outdoor timers are the simplest type of timer to program. They consist of a rotating dial with pins that can be pushed in or pulled out to set the on/off times. The dial is marked with hours, typically in a 24-hour format, and the pins correspond to these hours. To program the timer, the user pushes in the pins corresponding to the times when the device should be turned on. When the dial rotates to a section where the pins are pushed in, the timer switches to the "on" state. When the dial rotates to a section where the pins are pulled out, the timer switches to the "off" state.
First, locate the pins around the dial. These are small, usually triangular or rectangular, pieces of plastic surrounding the central dial. These pins control the on/off cycle of the timer.
Second, determine the desired on and off times. For example, if the user wants the lights to turn on at dusk (6 PM) and turn off at dawn (6 AM), the user needs to push in the pins between 6 PM and 6 AM. Each pin typically represents 15 to 30 minutes, depending on the specific model.
Third, push in the pins corresponding to the on times. Use a small tool, such as a screwdriver or pen, to push the pins inward. Ensure that the pins are fully pushed in to avoid any accidental switching. If the user wants the device to be on from 6 PM to 6 AM, push in all the pins between these hours. The pins that are "in" represent the "on" hours.
Fourth, set the current time. Rotate the dial until the arrow or marker on the timer aligns with the current time. Ensure the time is set accurately, as this will determine when the timer starts its on/off cycle. The dial should rotate in the direction indicated by the arrow on the timer.
Fifth, set the timer to "timer" mode. Most mechanical timers have a switch with options for "on," "off," and "timer." Set the switch to the "timer" position to activate the programmed schedule. The device will now turn on and off according to the programmed times.
To override the timer, switch it to "on" for continuous operation or "off" to disable the device entirely. This is useful for special events or when the user needs to deviate from the regular schedule.
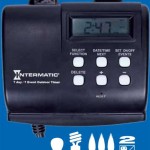
Programming a Stanley Digital Outdoor Timer
Digital outdoor timers offer more precise control over the on/off times. They typically feature a digital display and buttons for programming the desired schedule. Programming involves setting the current time, selecting the desired on/off times, and choosing the days of the week when the timer should operate.
First, the timer needs to be prepared. Some digital timers have a reset button that should be pressed before initial programming. This clears any previous settings and ensures a fresh start. Next, install batteries if required. Some digital timers use batteries as a backup power source in case of a power outage.
Second, set the current time and date. Use the "set," "clock," or similar button to access the time and date settings. Use the "+" and "-" buttons to adjust the hours, minutes, year, month, and day. Follow the on-screen prompts or the instructions in the user manual to navigate the settings. Ensure the time is accurate, including AM/PM if applicable. If the timer has a daylight saving time (DST) option, enable it if appropriate.
Third, program the on/off times. Press the "program," "timer," or similar button to enter the programming mode. The display will show available program slots (e.g., Program 1, Program 2). Select a program slot and set the desired on time using the "+" and "-" buttons. Then, set the desired off time. Repeat this process for each program slot needed. Most digital timers allow for multiple on/off settings per day, offering greater flexibility. Many digital timers also offer preset programs for common schedules, such as turning lights on at dusk and off at dawn.
Fourth, select the days of the week. After setting the on/off times, select the days of the week when the program should be active. Common options include weekdays, weekends, individual days, or a combination of days. Use the "+" and "-" buttons to cycle through the options and select the desired days. Ensure that the days are selected correctly to match the desired schedule.
Fifth, activate the timer. Once all the programs are set, exit the programming mode by pressing the "exit," "done," or similar button. Set the timer to "auto" or "timer" mode to activate the programmed schedule. The device will now turn on and off according to the configured times and days.
To override the timer, switch it to "on" for continuous operation or "off" to disable the device entirely. Some digital timers also have a manual override button that allows the device to be turned on or off temporarily without affecting the programmed schedule. When the manual override is disabled, the timer returns to its programmed schedule.
Troubleshooting Common Issues
Even with careful programming, issues can sometimes arise with Stanley outdoor timers. Common problems include the timer not turning on or off at the programmed times, the timer displaying incorrect information, or the timer not functioning at all.
If the timer is not turning on or off at the programmed times, first, verify the programmed schedule. Double-check the on/off times and the selected days of the week. Ensure that the time is set correctly and that the timer is in "timer" or "auto" mode. Second, check the power supply. Ensure that the timer is receiving power and that the outlet is functioning correctly. Test the outlet with another device to confirm that it is working. Third, examine the connected device. Ensure that the connected device is functioning correctly and that it is not drawing excessive power. Overloaded circuits can cause timers to malfunction. Fourth, reset the timer. Use the reset button to clear the settings and start the programming process again.
If the timer displays incorrect information, first, replace the batteries. If the timer uses batteries as a backup power source, replace them with fresh batteries. Low batteries can cause the display to malfunction. Second, recalibrate the timer. Follow the instructions in the user manual to recalibrate the timer. This may involve resetting the time and date. Third, contact customer support. If the display continues to malfunction, contact Stanley customer support for assistance.
If the timer is not functioning at all, first, check the power supply. Ensure that the timer is receiving power and that the outlet is functioning correctly. Second, inspect the timer for damage. Check for any visible damage to the timer, such as cracks or broken parts. Third, replace the timer. If the timer is damaged or is not functioning after troubleshooting, it may need to be replaced.
By carefully following the programming instructions and utilizing the troubleshooting tips, users can effectively operate their Stanley outdoor timers and enjoy the convenience of automated outdoor lighting and electrical devices.

Instructions On How To Program A Simple Noma Stanley Outdoor Timer

Digital Light Timer Select Twin Stanley Electrical Accessories

Stanley Lighttimer Select Trio Outdoor Darkness Sensing Timer

Stanley Lighttimer Select Trio Outdoor Darkness Sensing Timer

Programming Your Mechanical Timer

How To Program And Set Time On The Westinghouse Automatic Electric Timer

Stanley 2 Outdoor Photocell Timer W38463 Blain S Farm Fleet

Westinghouse Timers And Manuals

Stanley Lighttimer Select Twin 56436 Blain S Farm Fleet

Stanley Plugbank 6 Remote Stacker Meijer