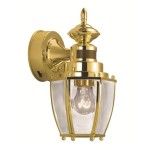
How to Paint Brass Outdoor Light Fixtures
Brass outdoor light fixtures, with their elegant sheen and timeless appeal, can enhance the curb appeal of any home. However, over time, the brass can tarnish, lose its luster, or simply become outdated. If you're looking to refresh your curb appeal without replacing your fixtures entirely, painting them is a cost-effective and rewarding solution. This guide will walk you through the process of successfully painting brass outdoor light fixtures, ensuring a durable and aesthetically pleasing finish.
Preparing the Brass Fixtures
Thorough preparation is crucial for achieving a long-lasting paint finish. This involves cleaning, sanding, and priming the brass fixtures to create a smooth and receptive surface for the paint.
Begin by cleaning the fixtures thoroughly. Use a mild detergent and a soft cloth to remove dirt, grime, and any existing coatings. For stubborn stains or tarnish, a brass cleaner can be used. Rinse the fixtures well with clean water and allow them to dry completely.
Once dry, sand the fixtures with fine-grit sandpaper (220-grit or finer). Sanding removes any remaining loose particles and creates a textured surface for the primer to adhere to. Be sure to wear a dust mask during this step to avoid inhaling dust particles.
After sanding, wipe the fixtures clean with a tack cloth to remove any dust or debris. This ensures a clean surface for the primer.
Applying Primer and Paint
The next step involves applying primer and paint. Primer acts as a barrier between the brass and the paint, promoting better adhesion and preventing the brass from bleeding through the paint.
Choose a primer specifically designed for metal surfaces. Apply the primer evenly using a small brush or a spray gun. Allow the primer to dry completely according to the manufacturer's instructions before proceeding to the next step.
Once the primer is dry, you can apply the paint. Choose a high-quality outdoor paint that is designed for metal surfaces and is resistant to fading, chipping, and weathering. Consider using a paint sprayer for a smooth and even finish, but a brush can also be used for smaller fixtures.
Apply the paint in thin coats, allowing each coat to dry completely before applying the next. Two coats are typically sufficient for a durable and aesthetically pleasing finish. When using a brush, ensure that the brushstrokes are smooth and even to avoid visible brush marks.
Protecting Your New Finish
After the paint has dried, you can seal the finish with a clear polyurethane sealant designed for outdoor use. This sealant provides an extra layer of protection against the elements and helps prevent chipping, fading, and weathering. Apply the sealant in thin coats, allowing each coat to dry completely before applying the next.
To prevent chipping, it is essential to handle the painted fixtures with care. Avoid bumping or scraping them, and let the paint cure completely for the specified time before handling them extensively.
Choosing the Right Paint
Selecting the right paint is crucial for achieving a durable and long-lasting finish. Here are some factors to consider when choosing paint for your brass outdoor light fixtures:
Type of Finish: Consider the desired finish. Matte finishes provide a subtle, non-reflective look, while glossy finishes offer a more polished and vibrant appearance. Semi-gloss finishes strike a balance between the two.
Color: Choose a color that complements your home's exterior and enhances its curb appeal. Popular choices for brass fixtures include black, white, and various earth tones.
Weather Resistance: Opt for paint that is specifically designed for outdoor use and is resistant to fading, chipping, and weathering.
Durability: Choose a paint that is durable and can withstand the elements, such as rain, snow, and UV rays.
Conclusion
Painting brass outdoor light fixtures is an excellent way to refresh your curb appeal and give your home a modern or traditional look. By following the steps outlined in this guide, you can achieve a professional-looking finish that will last for years to come. Remember to choose high-quality paint, prepare the fixtures thoroughly, and apply the paint carefully for optimal results.

Painting Over Brass With Rustoleum Oil Rubbed Broe Paint A Tutorial I Should Be Mopping The Floor

How To Spray Paint Brass Lights And Make Them Look Like New This Diy Bras Light Fixture Makeover

Make Old Outdoor Lighting Look New For 20 Thrifty Little Mom

Easy Exterior Light Update Outdoor Fixtures Painting

How To Paint Light Fixtures Front Porch Refresh Budget Friendly

Painting Over Brass With Rustoleum Oil Rubbed Broe Paint A Tutorial I Should Be Mopping The Floor

Outdoor Light Fixture Makeover Using Metallic Paint Inmyownstyle Com

Ugly Light Fixture Makeover Garden Sanity By Pet Scribbles

Update Porch Lights For Less Than 10

Can You Spray Paint Brass Light Fixtures Yes One Hundred Dollars A Month
Related Posts