How To Make an Outdoor Wood Burning Stove
An outdoor wood burning stove can be a valuable addition to any backyard, providing warmth, a cooking surface, and an element of rustic charm. Constructing one's own stove offers the opportunity to customize it to specific needs and aesthetic preferences. This article outlines the process of building an outdoor wood burning stove, detailing the materials required, the steps involved, and essential safety considerations.
The functionality of an outdoor wood burning stove relies on efficient combustion and heat retention. A well-designed stove will maximize the heat output from the fuel (wood) while minimizing smoke production. The design should also allow for easy loading of wood and efficient removal of ashes. Furthermore, the construction must be robust enough to withstand the elements and the high temperatures generated during use.
Planning and Design Considerations
Before commencing construction, it is crucial to develop a detailed plan. This involves determining the size and shape of the stove, the materials to be used, and the intended use. Several factors should influence these decisions, including the available space, the budget, and the desired level of functionality. A larger stove will provide more heat and allow for cooking larger meals, but it will also require more materials and take up more space. The design should also consider the prevailing wind direction in order to optimize smoke dispersal.
Consider the stove's intended purpose. Will it primarily be used for heating, cooking, or both? If cooking is a priority, a flat, stable surface for pots and pans is essential. A grate or grill can also be incorporated into the design. If heating is the primary function, a taller stove with a larger firebox may be more suitable. The overall aesthetic should also be considered, aiming for a design that complements the surrounding environment.
Safety should be a paramount concern during the planning phase. Choose a location that is a safe distance from flammable materials, such as trees, fences, and buildings. The stove should be placed on a non-combustible surface, such as concrete or gravel. It is also advisable to check local regulations regarding outdoor burning before starting construction. Some areas may have restrictions on the size and type of outdoor fires allowed.
Materials and Tools
The materials required for building an outdoor wood burning stove will depend on the chosen design and construction method. However, some common materials include:
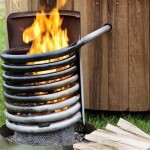
- Steel or Iron Sheets: These form the main body of the stove. Consider using thicker gauge metal for increased durability and heat retention.
- Steel Pipes: Used for the chimney or flue to direct smoke away from the user.
- Fire Bricks: These are essential for lining the firebox, protecting the outer metal from the intense heat.
- Welding Rods or Bolts/Nuts: Depending on the construction method, either welding or bolted connections will be necessary.
- Grate: A metal grate to support the wood fuel within the firebox.
- Door (Optional): A metal door can help control airflow and prevent sparks from escaping.
- High-Temperature Paint (Optional): To protect the metal from rust and corrosion, and to improve the appearance of the stove.
The following tools are typically required for constructing a wood burning stove:
- Welding Machine (If Welding): A suitable welding machine and associated safety equipment.
- Angle Grinder: For cutting and shaping metal.
- Cutting Discs and Grinding Wheels: For use with the angle grinder.
- Drill and Drill Bits: For creating holes for bolts or rivets.
- Measuring Tape: For accurate measurements.
- Level: To ensure the stove is level and stable.
- Metal File: For smoothing rough edges.
- Safety Glasses: Essential for protecting the eyes during cutting, grinding, and welding.
- Gloves: To protect the hands.
- Welding Helmet (If Welding): For protecting the eyes and face during welding.
Construction Process
The construction process will vary depending on the design, but the following steps provide a general outline:
1. Fabrication of the Stove Body: Cut the steel sheets to the required dimensions based on the drafted plans. Accurate measurements are essential for a structurally sound stove. The sheets are then formed into the desired shape, typically a cylinder or a box. This can be achieved through bending, rolling, or welding individual panels together. Ensure all seams are securely joined to prevent leaks and maintain structural integrity.
2. Installation of the Firebox Lining: The interior of the stove, where the fire will be built, should be lined with fire bricks. These bricks are designed to withstand extremely high temperatures and prevent the outer metal from warping or burning through. The fire bricks can be cemented in place using fire-resistant mortar. Ensure a tight fit between the bricks to maximize their protective effect. Alternatively, a double wall construction can be implemented, with an air gap between the inner and outer walls for insulation.
3. Chimney or Flue Attachment: A chimney or flue is essential for directing smoke away from the user. The flue should be securely attached to the top of the stove, ensuring a tight seal to prevent smoke leaks. The height of the chimney will affect the draft and the efficiency of the stove. A taller chimney generally provides a better draft. Secure the chimney against wind with appropriate bracing.
4. Grate Installation and Door Attachment (Optional): Install a metal grate inside the firebox to support the wood fuel. This allows for airflow beneath the fire, promoting more efficient combustion. If a door is desired, attach it to the front of the stove using hinges. The door should have a latch or other mechanism to securely close it. Provide an air inlet for sufficient oxygen to the fire.
5. Finishing Touches: Once the stove is assembled, inspect all welds and connections to ensure they are secure. Remove any sharp edges or burrs using a metal file. If desired, apply high-temperature paint to the exterior of the stove to protect it from rust and corrosion. Allow the paint to dry completely before using the stove.
6. Initial Test Firing: Before using the stove for cooking or prolonged heating, perform a small test firing. This will allow any residual oils or contaminants to burn off and ensure the stove is functioning correctly. Start with a small fire and gradually increase the amount of wood as needed. Monitor the stove for any leaks or other issues.
Safety Precautions
Operating an outdoor wood burning stove involves inherent risks, and adherence to safety precautions is paramount. Always operate the stove in a well-ventilated area, away from flammable materials. Never leave a burning stove unattended. Keep a fire extinguisher or a supply of water and sand nearby in case of emergency. Educate all users on the safe operation of the stove. Clear a wide area around the stove of dry leaves, brush, and other flammable debris.
When loading wood into the stove, use caution to avoid burns. Wear heat-resistant gloves and use tongs or other tools to handle the wood. Do not overfill the firebox, as this can cause the stove to overheat and potentially damage it. Dispose of ashes properly, ensuring they are completely cooled before discarding them in a metal container.
Regular maintenance is essential for ensuring the safe and efficient operation of the stove. Inspect the stove regularly for signs of wear and tear, such as cracks, rust, or loose connections. Repair any damage promptly. Clean the chimney or flue regularly to remove creosote buildup, which is a flammable substance that can cause chimney fires. Consider employing a spark arrestor on the chimney to reduce the risk of embers escaping and igniting nearby materials.
Consider the proximity to neighbors and the impact on air quality. Position the stove in a location that minimizes smoke exposure to neighboring properties. Be mindful of local regulations regarding outdoor burning and air quality standards. Use dry, seasoned wood, as it produces less smoke than green wood. Avoid burning trash or other materials that can release harmful pollutants into the air.

How To Make An Outdoor Wood Burning Stove Fireplace B Vintage Style

Plans How To Build A Wood Burning Outdoor Furnace Stove

Diy Rocket Stove For Your Outdoor Cooking Needs The Art Of Doing Stuff

How To Build An Outdoor Stove Ep 4 Howtospecialist Step By Diy Plans

23 Diy Wood Stoves To Keep You Warm

Building A Beautiful And Simple Outdoor Wood Stove Creative Cement Works

Wow Diy Beautiful And Unique Outdoor Smoke Free Wood Stove

How To Make An Outdoor Smokeless Wood Stove Is Very Simple And Effective Cement Crafts

Creative Outdoor Wood Stove Cement And Brick Ideas

How To Make A Wood Stove And Oven From Bricks Cement Diy Brick