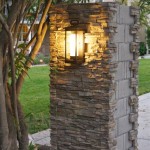
How to Install Outdoor LED Lights
Outdoor LED lights offer a multitude of benefits, from enhancing safety and security to adding ambiance and beauty to your outdoor space. Installing them yourself can be a rewarding project, allowing you to customize your lighting scheme and save on professional installation costs. This guide will walk you through the essential steps, ensuring your outdoor LED lights are installed correctly and safely.
1. Planning and Preparation
Before beginning any installation, proper planning is crucial. This involves understanding your needs, considering your budget, and gathering the necessary tools and materials.
Determine Your Lighting Needs:
*
Purpose:
Are you aiming for security lighting, decorative illumination, or both? *Areas to be illuminated:
Identify the specific areas you wish to light, such as pathways, walkways, gardens, or patios. *Desired brightness and style:
Consider the desired brightness level and the aesthetic you wish to achieve. *Placement:
Plan the location of each fixture, taking into account visibility, aesthetics, and potential obstructions.Budget Considerations:
*
Fixture type:
Choose a fixture that suits your needs and budget. LED lights are more expensive upfront but offer significant energy savings in the long run. *Quantity:
The number of fixtures needed will influence the overall cost. *Installation materials:
Factor in the cost of wires, connectors, and other installation materials.Gather Necessary Tools and Materials:
*
LED lights:
Choose fixtures that are specifically designed for outdoor use and are rated for weather resistance. *Wire and connectors:
Select the appropriate gauge wire and connectors based on the amperage of your LED lights. *Voltage transformer:
If using low-voltage lights, you will need a transformer to step down the voltage from your home's electrical system. *Electrical tape:
Use electrical tape to secure connections and prevent short circuits. *Screwdriver:
A standard screwdriver is needed for mounting the fixtures and securing wires. *Wire strippers:
Use wire strippers to remove insulation from wire ends. *Level:
A level ensures that your fixtures are mounted straight. *Ladder:
You may need a ladder to reach high areas. *Optional: Surge protector:
Consider using a surge protector to protect your LED lights from power surges.2. Wiring and Installation
Once you have the necessary tools and materials, you can begin wiring and installing your outdoor LED lights. This involves connecting the lights to a power source and mounting them in their designated locations.
Connect to Power Source:
*
Locate your electrical panel:
The first step is to find the electrical panel in your home. *Turn off power:
Before working with electrical wiring, always turn off the power to the circuit you will be using. *Connect the wires:
Connect the wires from your LED lights to the power source, ensuring correct polarity. *Secure connections:
Use electrical tape to secure all connections and prevent short circuits.Mount Fixtures:
*
Choose mounting location:
Select the desired location for each fixture, keeping in mind accessibility, visibility, and aesthetics. *Mark and drill holes:
Mark the mounting location on the surface and drill holes if necessary. *Mount the fixture:
Securely mount the fixture using screws or other appropriate fasteners. *Install Bulbs:
If necessary, install the bulbs in the fixtures.3. Testing and Troubleshooting
After completing the installation, it's important to test the lights to ensure they are working properly. If you encounter any issues, troubleshooting is essential to diagnose and resolve the problems.
Testing:**
*
Turn on the power:
Once the installation is complete, turn on the power to the circuit. *Check functionality:
Verify that all LED lights are functioning as expected. *Inspect connections:
Examine all connections for loose wires or other signs of potential problems.Troubleshooting:**
*
No power:
Check the circuit breaker to ensure it has not tripped. *Dim or flickering lights:
Inspect the connections for loose wires or poor contact. *One or more lights not working:
Check the bulbs and try replacing them. *Overheating:
Ensure the fixtures have adequate ventilation and are not in direct sunlight.By following these steps, you can successfully install your outdoor LED lights, adding a touch of elegance and functionality to your outdoor space. Remember to prioritize safety and follow all electrical codes and regulations to ensure a safe and efficient installation.

Outdoor Led Lighting Install

How To Install Led Strip Lights Ledmyplace

How To Choose And Install Led Garden Lights

How To Install Ultra Thin Exterior Lighting All About Lights Ask This Old House

How To Install Led Recessed Lights For Outdoor Concrete Spaces In Lite Lighting

Led Security Lights The Ultimate Guide To Home Safety

Step By Guide Installing Outdoor Lighting Around Your Home Govee

How To Install Outdoor Low Voltage Led Step Lights Mullan Lighting

120v Led Light Strips Long Run For Indoors And Out Ledsupply Blog

How To Choose And Install Led Garden Lights