How to Install an Outdoor Wood Furnace: A Comprehensive Guide
An outdoor wood furnace, also known as an outdoor wood boiler, is a heating system designed to burn wood outside the building it is heating. It transfers the heat produced to the building through insulated underground pipes carrying water or a water/antifreeze mixture. This system offers an alternative heating solution, potentially reducing reliance on conventional fuels like oil, propane, or natural gas. However, the installation of an outdoor wood furnace is a complex undertaking that requires careful planning, meticulous execution, and adherence to local regulations and safety standards.
This article provides a detailed guide on how to install an outdoor wood furnace. It outlines the key steps involved, from site preparation to system startup, emphasizing critical safety considerations and best practices to ensure a successful and efficient installation. It is crucial to note that this guide offers general information and should not replace professional consultation. Consulting with qualified HVAC technicians, plumbers, and local authorities is highly recommended before commencing any installation work.
Key Point 1: Planning and Preparation
Before attempting any physical installation, thorough planning and preparation are essential. This phase encompasses selecting the appropriate furnace model, determining the optimal location, obtaining necessary permits, and gathering all required materials and tools.
Furnace Selection: The size and type of outdoor wood furnace should be carefully chosen based on the heating needs of the building. Factors to consider include the square footage of the area to be heated, the building's insulation levels, typical climate conditions, and the type of heating system currently in place (e.g., forced air, radiant heat). Consult with a reputable furnace dealer or HVAC professional to determine the appropriate BTU (British Thermal Unit) rating for your specific application. The model must also comply with local emission standards.
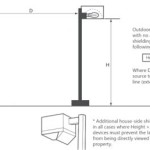
Site Selection: Choosing the right location for the outdoor wood furnace is critical for safety, efficiency, and regulatory compliance. The furnace should be placed on a level, non-combustible surface, such as a concrete pad, and located a safe distance away from buildings, trees, overhead power lines, and other combustible materials. Local regulations often specify minimum setback distances. Consider prevailing wind direction to minimize smoke nuisance to neighbors. Access for firewood delivery and ash removal should also be factored into the location decision. A clear and unobstructed path for smoke to dissipate is crucial for air quality.
Permitting: Before starting any work, obtain all necessary permits from local authorities. Permit requirements vary depending on location and often involve inspections to ensure compliance with building codes, zoning regulations, and environmental standards related to emissions. Failing to obtain required permits can result in fines, project delays, and even forced removal of the furnace.
Materials and Tools: Create a comprehensive list of all materials and tools required for the installation. This typically includes the outdoor wood furnace itself, insulated underground piping, fittings, connectors, circulating pumps, expansion tanks, safety valves, controllers, thermometers, pressure gauges, concrete mix (if pouring a new pad), shovels, a tamper, levels, measuring tapes, pipe cutters, soldering equipment (if required), electrical wiring, conduit, and appropriate safety gear (gloves, eye protection, hearing protection). Ensure the insulated piping selected is specifically designed for underground burial and hot water/antifreeze transport.
Safety Precautions: Prioritize safety throughout the entire installation process. Wear appropriate personal protective equipment (PPE) at all times. Disconnect power to any electrical circuits you will be working on. Have a fire extinguisher readily available. Ensure adequate ventilation when working in enclosed spaces. If you are not comfortable performing any part of the installation yourself, hire a qualified professional.
Key Point 2: Installation Process
The installation process involves several distinct stages, including preparing the site, installing the underground piping, connecting the furnace to the heating system, and completing electrical wiring.
Site Preparation: Begin by preparing the selected site. If necessary, pour a concrete pad to provide a stable and non-combustible base for the furnace. Ensure the pad is level and adequately sized to accommodate the furnace footprint. Allow the concrete to cure fully before placing the furnace on the pad. If a concrete pad is already in place, inspect it for cracks or damage and repair as needed. Proper leveling is essential for the efficient operation of the furnace.
Trenching and Piping: Dig a trench between the outdoor wood furnace and the building it will heat. The depth of the trench should be sufficient to bury the insulated underground piping below the frost line, preventing freezing during cold weather. The width of the trench should allow for easy installation and maintenance of the piping. Install the insulated underground piping, ensuring proper sealing and connections at all joints. Use appropriate fittings and connectors to prevent leaks. Backfill the trench with soil, compacting it in layers to protect the piping. Mark the location of the buried piping to prevent accidental damage in the future. Consider using tracer wire alongside the piping for future location purposes.
Building Connection: Connect the underground piping to the existing heating system inside the building. This typically involves connecting to a heat exchanger or a hot water storage tank. Ensure that the connection is compatible with the existing system and that all connections are properly sealed and insulated. Install isolation valves on both the supply and return lines to allow for future maintenance or repairs without draining the entire system. If connecting to a forced-air system, a water-to-air heat exchanger will be required.
Plumbing Connections: Connect the furnace to the water supply and install necessary plumbing components such as circulating pumps, expansion tanks, and safety valves. The circulating pump circulates the heated water/antifreeze mixture between the furnace and the building. The expansion tank accommodates the expansion and contraction of the fluid due to temperature changes. The safety valve releases pressure if it exceeds a safe level. Place a pressure gauge and thermometer in accessible locations for monitoring the system’s performance. Ensure that the plumbing connections are leak-proof and properly insulated.
Electrical Wiring: Connect the electrical wiring to the furnace, following the manufacturer's instructions and local electrical codes. This typically involves connecting the furnace to a dedicated circuit and installing a disconnect switch for safety. Ensure that all wiring is properly grounded and protected from moisture. Install a thermostat or controller to regulate the furnace's operation. If unsure about any electrical work, hire a qualified electrician.
Key Point 3: System Startup and Testing
After completing the physical installation, it is essential to perform a thorough system startup and testing procedure to ensure proper operation and identify any potential issues.
Filling and Priming: Fill the system with water or a water/antifreeze mixture, following the manufacturer's recommendations. Bleed air from the system to prevent airlocks. Start the circulating pump and check for leaks. Ensure that the expansion tank is properly pressurized. Monitor the water level in the furnace and add water as needed. Use the correct type of antifreeze specifically formulated for hydronic heating systems.
Initial Firing: Start a small fire in the furnace and gradually increase the amount of wood. Monitor the temperature and pressure gauges to ensure that the system is operating within the recommended range. Check for any unusual noises or smells. Observe the smoke output to ensure that the furnace is burning efficiently. Never overfire the furnace, as this can damage the unit and pose a safety hazard.
Testing and Adjustments: Test all components of the system, including the circulating pump, thermostat, and safety valves. Adjust the settings as needed to optimize performance. Monitor the heat output in the building to ensure that it is sufficient to maintain a comfortable temperature. Check for any cold spots or uneven heating. Pay attention to the efficiency of the burn and adjust the air intake accordingly to achieve optimal combustion.
Inspection and Maintenance: Regularly inspect the furnace for any signs of damage or wear. Clean the firebox and chimney as needed to prevent creosote buildup. Maintain the proper water level and pressure in the system. Consult the manufacturer's instructions for recommended maintenance procedures. Establish a regular maintenance schedule to ensure the long-term reliability and efficiency of the furnace. Regularly check the flue for creosote buildup and have it professionally cleaned as needed.
Safety Checks: Regularly test the safety valves to ensure they are functioning properly. Install carbon monoxide detectors in the building to alert occupants of any potential leaks. Ensure that smoke detectors are properly installed and functioning. Keep a fire extinguisher readily available near the furnace. Review safety procedures with all occupants of the building. Educate all users on the proper operation and safety precautions related to the use of the outdoor wood furnace.
Installing an outdoor wood furnace is a substantial project requiring careful planning and execution. Adherence to safety guidelines, local regulations, and manufacturer's instructions is paramount. While this guide provides a comprehensive overview, consulting with qualified professionals is strongly recommended to ensure a safe and efficient installation. Regular maintenance and ongoing safety checks are essential for the long-term performance and safety of the system.

Outdoor Wood Coal Boiler Installation

Installation Of A Nature S Comfort Outdoor Wood Furnace

Installation Of A Nature S Comfort Outdoor Wood Furnace

Outdoor Furnace Installation Tips For Do It Yourselfers And Pros

Installation Diagrams Portage Main Boilers Duluth Mn Boiler Outdoor Wood Furnace Burner

Plumbing Installation Ez Boilers Outdoor

Installation Diagrams Portage Main Boilers Duluth Mn

Installation Diagrams Portage Main Boilers Duluth Mn

Outdoor Wood Coal Boiler Installation

Outdoor Wood Burning Furnace Boilers From Madison Wi To E Iowa
Related Posts