How to Change an Outdoor Lighting Fixture
Outdoor lighting fixtures play a crucial role in enhancing the aesthetics and security of a home. Over time, these fixtures may become outdated, damaged, or simply require an upgrade. Replacing an outdoor lighting fixture is a relatively straightforward task that can be accomplished with basic tools and some essential knowledge. This article will guide you through the process of changing an outdoor lighting fixture, providing clear instructions and helpful tips.
1. Preparation and Safety
Before commencing the replacement process, it is essential to prioritize safety. Ensure the power supply to the fixture is disconnected at the circuit breaker. This step is crucial to prevent electrical shocks. It's also advisable to wear protective gear such as gloves and safety glasses to prevent potential injuries.
Once the power is off, carefully inspect the existing fixture. Familiarize yourself with its wiring and the types of connections involved. Take note of the fixture's style, size, and any special features, such as motion sensors or photocells. This information will be helpful when choosing a replacement fixture.
2. Removing the Old Fixture
With the power disconnected, the next step is to remove the old fixture. This typically involves unscrewing the mounting screws or bolts that secure the fixture to the mounting surface. Carefully disconnect the wiring from the old fixture, taking note of the color codes for each wire (usually black for hot, white for neutral, and green or bare copper for ground).
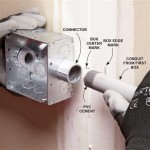
If the old fixture is attached to a mounting box, it may be necessary to remove the box as well. This is often the case with older fixtures that were installed before modern electrical codes required the use of junction boxes. Ensure that the junction box is securely attached to the structure and that the wires are properly terminated within the box.
3. Installing the New Fixture
Once the old fixture has been removed, you can begin installing the new fixture. Begin by mounting the new fixture to the mounting surface using the provided screws or bolts. Ensure that the fixture is securely mounted and level. Next, connect the wiring from the new fixture to the existing wiring in the junction box.
Connect the black wire (hot) from the new fixture to the black wire (hot) from the existing wiring. Connect the white wire (neutral) from the new fixture to the white wire (neutral) from the existing wiring. Lastly, connect the green or bare copper wire (ground) from the new fixture to the green or bare copper wire (ground) from the existing wiring. Double-check all connections to ensure they are secure and properly insulated.
4. Testing and Finishing Touches
After completing the wiring connections, carefully re-install any covers or trims for the new fixture. Once everything is in place, carefully restore power to the circuit breaker. Test the new fixture by turning on the switch. If the fixture illuminates properly, you have successfully replaced the outdoor lighting fixture.
Finally, take a moment to admire your new outdoor lighting. Consider adding a layer of sealant or weatherproofing to protect the fixture from the elements. If the new fixture includes any special features, such as motion sensors or photocells, ensure they are functioning correctly.
By following these steps and taking the necessary safety precautions, you can confidently replace your outdoor lighting fixture and enhance the functionality and aesthetics of your home.

Easy Outdoor Light Fixture Update 20 Minute Diy Upgrade

How To Replace An Outdoor Light Fixture

Replacing An Outdoor Light Fixture

Easy Outdoor Light Fixture Update 20 Minute Diy Upgrade

Replacing Outdated Porch Lights Megan Plus Five

Replacing An Outdoor Light Fixture

How To Change An Outdoor Light Fixture On Diffe Types Of Siding The Home Depot

How To Install Replace Outdoor Light Easy Simple

How To Change An Outdoor Light Fixture On Diffe Types Of Siding The Home Depot

How To Replace Outdoor Wall Light Fixture
Related Posts