DIY Outdoor LED Lighting: A Comprehensive Guide
Outdoor lighting enhances the aesthetics, safety, and functionality of residential and commercial properties. Properly illuminated outdoor spaces extend the usability of yards, patios, and driveways, while also deterring potential intruders. While professional installation is a viable option, many property owners choose the DIY approach for its cost-effectiveness and customization possibilities. Selecting LED (Light Emitting Diode) lighting is often preferred due to its energy efficiency, longevity, and versatility. This article provides a comprehensive guide to planning and implementing DIY outdoor LED lighting projects.
Planning Your Outdoor LED Lighting Project
The initial phase of any DIY project involves careful planning. This stage is crucial in ensuring a successful and safe installation. Several factors should be considered, including the project's purpose, the specific areas to be illuminated, the desired lighting effect, and the electrical requirements.
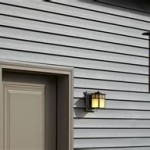
Defining the Purpose: Before purchasing any materials, clearly define the objectives of your outdoor lighting. Is the goal to improve security, highlight landscaping features, create an ambient atmosphere for outdoor entertaining, or simply illuminate walkways and entryways? Identifying the primary purpose will guide the selection of appropriate fixtures and lighting techniques. For security, brighter, more focused lights are typically necessary. For ambiance, softer, diffused lighting with warmer color temperatures may be more suitable.
Identifying Key Areas: Conduct a thorough assessment of the outdoor spaces to be illuminated. Prioritize areas based on necessity and aesthetic appeal. Common areas include: pathways and walkways, driveways, patios and decks, gardens and landscaping, entryways and doorways, architectural features of the building. Each area may require a different type and intensity of lighting. Walkways benefit from evenly spaced path lights, while architectural features might be enhanced with strategically placed spotlights.
Determining the Desired Lighting Effect: Consider the desired ambiance and visual impact. Different lighting techniques can create vastly different effects. Uplighting involves placing lights at ground level and directing them upwards to highlight trees, shrubs, or architectural details. Downlighting simulates moonlight by mounting lights high up and directing them downwards, creating a soft, natural glow. Path lighting illuminates walkways and driveways, increasing safety and visibility. Accent lighting emphasizes specific features, such as sculptures or water features. Choosing the appropriate lighting technique will significantly influence the overall aesthetic.
Assessing Electrical Requirements: This is a critical step, particularly for projects involving mains voltage (120V or 240V). Determine the available power source and its capacity. Calculate the total wattage required for all proposed LED fixtures. Ensure that the existing electrical circuit can handle the additional load. If not, consider upgrading the circuit or using low-voltage (12V or 24V) LED systems. Low-voltage systems are inherently safer and easier to install, as they eliminate the need for direct wiring to the mains voltage. However, they may require a transformer to convert the mains voltage to the lower voltage.
Creating a Lighting Plan: Based on the above considerations, create a detailed lighting plan. This plan should include a sketch of the property, indicating the location of each light fixture, the type of fixture, and its wattage. It should also specify the wiring route and the location of any necessary transformers or control units. A well-defined lighting plan will serve as a roadmap throughout the installation process and minimize errors.
Selecting the Right LED Fixtures and Components
Choosing the appropriate LED fixtures and components is vital for achieving the desired lighting effect and ensuring long-term performance. Numerous options are available, each with its own advantages and disadvantages. Key factors to consider include the type of fixture, light output, color temperature, and weather resistance.
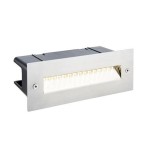
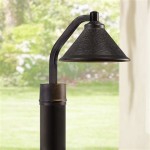
Types of LED Fixtures: LED fixtures come in a wide variety of styles to suit different applications. Path lights are designed for illuminating walkways and driveways. Spotlights are used for accenting specific features or providing focused illumination. Floodlights provide broad coverage and are often used for security purposes. Deck lights are flush-mounted fixtures that are integrated into decks and patios. String lights offer a decorative touch and are suitable for creating a festive atmosphere. Choosing the right type of fixture for each location is essential for achieving the desired effect.
Light Output (Lumens): Lumens measure the total amount of visible light emitted by a light source. Higher lumen values indicate brighter light. The required lumen output depends on the intended use of the lighting. Path lights typically require lower lumen outputs (50-100 lumens), while floodlights may require significantly higher outputs (800-1600 lumens or more). Consider the size of the area to be illuminated and the desired level of brightness when selecting fixtures with appropriate lumen ratings.
Color Temperature (Kelvin): Color temperature refers to the warmth or coolness of the light emitted by a light source. It is measured in Kelvin (K). Lower Kelvin values (2700-3000K) produce a warm, yellowish light that is often preferred for creating a cozy and inviting atmosphere. Higher Kelvin values (4000-5000K) produce a cooler, whiter light that is often used for task lighting or security purposes. Choosing the appropriate color temperature is crucial for achieving the desired ambiance.
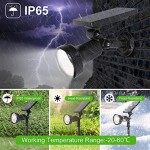
Weather Resistance (IP Rating): Outdoor lighting fixtures must be able to withstand the elements. The Ingress Protection (IP) rating indicates the level of protection provided against dust and water. A higher IP rating indicates greater protection. Fixtures with an IP rating of IP65 or higher are typically recommended for outdoor use, as they are protected against dust and low-pressure water jets. For areas that are directly exposed to rain and snow, fixtures with an IP rating of IP67 or IP68 may be necessary.
Other Components: In addition to LED fixtures, other components may be required, depending on the complexity of the project. These may include: low-voltage transformers (for converting mains voltage to low voltage), wire connectors (for making secure electrical connections), timers or photocells (for automatically turning lights on and off), and landscape wiring (for connecting fixtures to the power source). Ensure that all components are rated for outdoor use and are compatible with the chosen LED fixtures.
Installing Your Outdoor LED Lighting System
Once the planning and selection phases are complete, the installation process can begin. Safety is paramount throughout the installation process. Always disconnect the power supply before working with electrical wiring. If unfamiliar with electrical work, consider consulting a qualified electrician.
Safety Precautions: Before commencing any electrical work, turn off the power at the circuit breaker. Use a voltage tester to confirm that the power is off. Wear appropriate safety gear, including safety glasses and gloves. Avoid working in wet conditions. Follow all local electrical codes and regulations. If unsure about any aspect of the installation, consult a qualified electrician.
Wiring and Connections: Proper wiring and secure connections are essential for a safe and reliable outdoor lighting system. Use direct burial-rated landscape wiring for all outdoor wiring. This type of wiring is specifically designed to withstand the harsh conditions of burial. Use waterproof wire connectors to ensure that all connections are protected from moisture. Follow the manufacturer's instructions when making connections. Ensure that all wires are properly insulated and secured.
Fixture Placement and Mounting: Carefully position the LED fixtures according to the lighting plan. Ensure that the fixtures are securely mounted to prevent them from being dislodged by wind or other factors. For path lights, ensure that they are evenly spaced and provide adequate illumination without creating glare. For spotlights and floodlights, aim them carefully to highlight the desired features without causing light pollution. Use appropriate mounting hardware for each type of fixture.
Trenching and Burial: Bury all underground wiring at a safe depth, typically 6-12 inches below the surface. Use a trenching tool or a shovel to create the trenches. Lay the wiring in the trenches and cover it with soil. Consider using conduit to protect the wiring from damage caused by digging or other activities. Mark the location of the buried wiring to prevent accidental damage in the future.
Testing and Adjustments: After completing the installation, carefully test the system to ensure that all fixtures are working properly. Turn on the power at the circuit breaker and check each fixture to verify that it is illuminated. Adjust the aiming of spotlights and floodlights as needed to achieve the desired effect. Use a light meter to measure the illuminance in different areas and make adjustments as necessary. Fine-tune the timer or photocell settings to ensure that the lights turn on and off at the desired times.
By following these guidelines, property owners can successfully implement DIY outdoor LED lighting projects that enhance the beauty, safety, and functionality of their outdoor spaces. Careful planning, proper component selection, and safe installation practices are crucial for achieving optimal results.

Diy Outdoor Lighting Projects Screen Enclosure

Diy Outdoor Lighting 8 Cool Lights Bob Vila

28 Backyard Lighting Ideas How To Hang Outdoor String Lights

7 Diy Outdoor Lighting Ideas To Illuminate Your Summer Nights Photos Huffpost Life

Creative And Easy Diy Outdoor Lighting Ideas The Navage Patch

41 Diy Outdoor Lighting Ideas

Diy Outdoor Lights Simple And Easy Ideas For Homes Craftionary

Georgeswork A Very Bright 1 Watt Diy Led Garden Light

35 Best Diy Outdoor Lighting Ideas And Designs For 2024

Diy Outdoor Lights Simple And Easy Ideas For Homes Craftionary
Related Posts