How to Add a Photocell to an Outdoor Light
Outdoor lighting plays a crucial role in enhancing home security, curb appeal, and overall ambience. While traditional light switches offer manual control, photocells automate the process, turning lights on at dusk and off at dawn. Installing a photocell to an existing outdoor light is a simple DIY project that can save energy and enhance convenience. This guide outlines the steps involved in adding a photocell to an outdoor light.
1. Choosing and Gathering the Right Photocell
Selecting the appropriate photocell is paramount for successful installation. Photocells come in various types, each with specific features and functionalities.
Consider the following factors when making a selection:
- Type of Photocell: Photocells are available in two main types:
- Direct-mount photocells: Designed for mounting directly on the light fixture itself, offering a streamlined and compact installation.
- Remote-mount photocells: Provide flexibility in mounting location, allowing placement at a distance from the fixture, often used for custom configurations.
- Voltage Compatibility: Ensure that the photocell's voltage rating matches the light fixture's requirements.
- Light Sensitivity: Choose a photocell with sensitivity levels suitable for your needs. Higher sensitivity activates lights in dimmer conditions, while lower sensitivity requires darker environments.
- Dusk to Dawn Functionality: Most photocells offer dusk-to-dawn functionality, automatically turning lights on at sunset and off at sunrise.
Once you've chosen the right photocell, gather essential materials for the installation process:
- Wire strippers: To strip insulation from electrical wires.
- Wire cutters: To cut wires precisely.
- Wire connectors: To securely connect electrical wires.
- Screwdriver: For mounting the photocell and securing connections.
- Electrical tape: To insulate and protect wires.
- Voltage tester: To verify power availability and proper connections.
2. Disconnecting Power to the Light Fixture
Safety is paramount during any electrical project. Before starting, disconnect power to the outdoor light fixture by:
- Locating the Circuit Breaker: Identify the circuit breaker controlling the outdoor light fixture. Refer to your electrical panel or consult a professional if you are unsure.
- Turning Off the Breaker: Switch the circuit breaker to the OFF position. It's crucial to ensure the power is completely off before working with any electrical wires.
- Verifying No Power: Use a voltage tester to confirm that the light fixture is completely de-energized.
3. Installing the Photocell
The installation process varies slightly depending on the type of photocell chosen. Here are general steps for both direct-mount and remote-mount installations:
Direct-Mount Photocells
- Mount the Photocell: Locate the mounting area on the light fixture. Most photocells are designed for easy attachment using screws or clips.
- Connect Wires: Identify the photocell's terminals. The photocell typically has three wires: a black wire (hot), a white wire (neutral), and a red wire (load).
- Connect the photocell's black wire to the light fixture's black wire.
- Connect the photocell's white wire to the light fixture's white wire.
- Connect the photocell's red wire to the wire connecting the light fixture's bulb.
- Secure Connections: Use wire connectors to ensure secure connections between the wires. Wrap wire connectors with electrical tape to prevent short circuits or exposed wires.
Remote-Mount Photocells
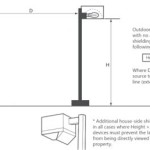
- Select a Mounting Location: Choose a location for the photocell that is exposed to direct sunlight and offers a clear view of the sky. It's recommended to mount the photocell at least 5 feet above ground level to minimize interference from ambient light sources.
- Run Wires: Run wires from the photocell to the light fixture. Use weatherproof cable for outdoor applications. If necessary, install conduit or protective sleeves to safeguard the wires.
- Connect Wires: Connect the photocell wires to the light fixture wires, following the same wiring instructions as for direct-mount photocells.
- Mount the Photocell: Securely mount the photocell to the chosen location using appropriate mounting hardware.
4. Restoring Power and Testing
Once the photocell is installed, restore power to the light fixture by turning the circuit breaker back ON. Use the voltage tester to verify that power is flowing to the fixture and the photocell. Test the installation by covering the photocell and observing if the light turns on.
If the light turns on when the photocell is covered and turns off when exposed to light, the installation is successful. However, if the light remains on regardless of the photocell's illumination, check for faulty connections or wiring errors.
Adding a photocell to an outdoor light offers numerous benefits, including energy savings, automated control, and enhanced safety. Following these steps will enable you to successfully install a photocell and enjoy the advantages of automated outdoor lighting.

How To Add A Light Sensor Outdoor Lanterns The Navage Patch

Electrical Wiring From A Photocell To An Outdoor Led Floodlight Or Reflector 110v Devices

How To Install And Troubleshoot Photo Eye

Easy Install Automatic Light Sensor Switch Photocell Ldr For Lighting Wiring And Setup

Dusk To Dawn Photocell Switch Installation

How To Install Photocell For Outdoor Light Control Sensor

Installing A Photocell Sensor

Steps To Follow Add Photocell In Outdoor Lights Ledmyplace

Install The Photocell Sensor

Hardwire Post Eye Light Control With Photocell Automatic Sensor Switch Ledwholers
Related Posts